Quick facts
- Select trees and shrubs based on the soil, light, climate and residential conditions at the site.
- There are different planting and transplanting methods for different types of tree stock.
- Proper watering, mulching, fertilizing, pruning, staking and winter care will help keep your new and transplanted trees healthy.
When planting and transplanting trees and shrubs, it's important to consider the site conditions and the type of tree stock.
After planting, take care of the new tree or shrub by watering, mulching, fertilizing, pruning, staking and exercising winter care.
Planning the site
The conditions of the planting site are as important as the plant. Consider soil type and drainage, available water and sunlight, exposure to drying winds and other factors.
Matching the needs of the plant to the site increases the plant’s performance and longevity.
The first step in checking the condition of the planting site is to examine the soil. Is it sandy and well drained? Is it moist with some organic material? Is it heavy, wet and compacted clay?
Construction practices such as cutting and filling, installation of underground utilities, and backfilling against foundations can create different soil structures. This variability can change with depth and between planting locations on the same property. Investigate each planting site.
Soil texture and drainage
- Soil texture and drainage are closely related.
- Sandy soils are well drained, and have large pore spaces and poor water-holding capabilities. They are associated with dry conditions.
- Clay soils have much smaller pore spaces, are poorly drained and can suffocate plant roots.
- The pore spaces in soil are very important to plant growth because the oxygen that occupies them is essential to healthy roots.
- A tree planted in poorly drained soil will be slow to establish, lack vigor, and often will slowly die.
- A poorly drained soil
- is high in moisture but low in oxygen
- prevents proper root development
- slows growth of beneficial soil microorganisms that are responsible for decomposing organic matter and releasing plant nutrients
Checking and improving soil drainage
- Check soil drainage before planting.
- Dig a hole 18 inches deep, fill it with water, and let it stand overnight.
- If the water has not drained by morning, there is a drainage problem.
- Do not test the drainage in this manner after heavy rainfall or before the ground has thawed in the spring.
- If soil drainage is poor, consider planting species that are tolerant of poorly drained soils or improving soil drainage.
- If a hard pan is present (a compacted, impermeable layer of soil) with an underlying layer of well-drained soil, dig a hole down to the permeable layer to provide drainage for the planting hole.
- If the soil is poorly drained and there is no well-drained layer below, build a tile system.
- This is expensive and requires the assistance of a professional for proper design.
- Simply adding gravel to the bottom of the planting hole will further decrease oxygen availability to the root system.
Compacted soil
- Compaction of the soil by vehicles or people can reduce pore space and restrict water infiltration.
- In compacted soil, oxygen is depleted, carbon dioxide accumulates, and root penetration is reduced.
- This causes physical damage to the roots of existing trees.
- Aerating the soil will help correct the problem.
Soil pH
- Soil pH is a measure of the acidity or alkalinity of a soil.
- A pH below 7 (7 is neutral) would indicate an acid soil, and a pH above 7 indicates an alkaline soil.
- Calcium carbonate or lime raises soil pH.
- Many plants have an optimal range of pH. Most trees thrive on a pH between 5.5 and 6.5.
- Consider plant species that will tolerate a high pH for areas with buried concrete, near foundations, or sidewalks, etc.
- Plant species considered tolerant of high pH (greater than 7.0, but less than 8.0) include: green ash, white ash, amur corktree, ginkgo, hackberry, honeylocust, and Russian olive.
- Evergreens perform best in slightly acidic conditions.
- There are some exceptions: arborvitae, ponderosa pine, and Colorado blue spruce can tolerate a wider pH range (6.5-7.3).
- Before a plant is planted on a particular site, conduct a soil test to determine possible pH problems or nutrient deficiencies.
Newly planted trees or shrubs require more frequent watering than established trees and shrubs. Depending on rainfall amounts, you may need to water your newly planted tree or shrub by hand.
Water immediately after you plant the tree or shrub. This reduces transplant stress and helps settle soil around the roots.
Apply water directly over the root zone of the plant.
- Apply 1-1.5 gallons per inch of trunk diameter. For example, a tree with a 1-inch diameter trunk requires at least 1 gallon of water at each watering.
- Newly planted shrubs require about 1/4 to 1/3 of the volume of the container that the shrub was purchased in.
Water your new tree or shrub as follows, depending on rainfall amounts.
- Water every day for 1 to 2 weeks after planting.
- Water every 2 to 3 days for 12 weeks after planting.
- After 12 weeks, water weekly until roots are established.
-
A steady 1-inch rain may replace one day of watering. Mulching the root area of your plant will also help hold in moisture. When in doubt, feel the soil around your plant.
For more specifics see Watering newly planted trees and shrubs.
Planting in wet conditions
Standing water or a high water table means low oxygen content in the soil. Select plants that are tolerant of excess water for low areas where water may be standing or very close to the surface, or where a heavy clay soil exists.
- Trees that tolerate moisture: river birch, larch, hackberry, bicolor oak, red maple.
- Shrubs that tolerate moisture: silverberry, willow, alder, leatherwood, swamp rose, elderberry.
Planting in dry conditions
Drought tolerant trees can withstand extended periods with little water and are best suited for sandy soils.
- Trees that tolerate dry soil conditions: ginkgo, hackberry, Kentucky coffeetree, northern catalpa, honeylocust, serviceberry, hawthorn, linden.
- Shrubs that tolerate dry soil conditions: sumac, alpine currant, hydrangea, elderberry, buffaloberry, spirea, potentilla, ninebark, viburnum, lilac.
For more plant choices, visit our plant selection database, Plant Elements of Design.
- Although some plants can tolerate low light conditions, most require full sun to maintain their vigor and attain their full potential.
- Trees that are more shade tolerant include: green ash, white ash, river birch, ironwood, Kentucky coffeetree, American linden, Norway maple, hackberry, red maple and sugar maple.
- Some plants may require some protective shade to prevent leaf scorch and desiccation.
The location of the planting site in relation to other trees and objects such as buildings, fences, etc. will affect temperature and moisture conditions.
- Prevailing westerly winds will have a drying effect on non-protected sites.
- The south side of a building will be much warmer and drier than the north side.
- The warming effect of the sun on a cold winter day can cause injury to the bark and may cause the tree trunk to split.
- For evergreens, this warming can cause water loss and needle damage when the temperature is again lowered.
- The amount of protection provided by individual microclimates can affect plant hardiness.
Different tree and shrub stocks
- Bare root plants are dug from nursery fields in the fall or spring. Soil is removed from the roots, and plants are held in humidity and temperature controlled storage over winter.
- Plant them in early spring before growth begins.
- Many roots are cut during field digging, so bare root plants suffer severely from transplanting shock.
- Bare root stock is normally the least expensive, but if handled improperly, can have the highest mortality.
- When handling or transporting bare root stock, keep the roots moist and protected from sun and wind at all times.
- Packaged trees and shrubs are bare root plants with their roots packed in moist material such as peat moss or shingle tow.
- Plant them in early spring before growth starts.
- Keep packing materials moist, and the package cool and shaded until planted.
- Treat these plants as bare root plants.
- Field-potted nursery stock are field-grown plants dug with a ball of field soil intact, then placed in a container.
- Sell and plant them during the spring, as field soil will not provide good plant growth in a container.
- Disturb the root ball as little as possible during the digging and planting process.
- Containerized trees and shrubs are dug from the nursery in the spring or fall as bare root stock.
- They are then placed and sold in a container with a special growing medium
- If containerized in early spring, most plants will be sufficiently established in the container. Transplant them in late spring, summer or fall.
- Roots must be established in the container and hold the media together before transplanting.
- Do not completely break up the root ball at planting time, but do cut any circling roots prior to planting.
- The tighter the root ball, the more the root system should be disturbed.
- Container grown stock has been growing in a container throughout most of its life.
- Container grown plants suffer little transplant shock because their roots are not disturbed during planting.
- Plant them any time during the growing season.
- Plants that have outgrown their containers may have deformed root systems, which can result in girdling roots.
- Large plants may be root bound in the container. The root ball of these plants must be torn or cut open to eliminate subsequent circling or girdling roots.
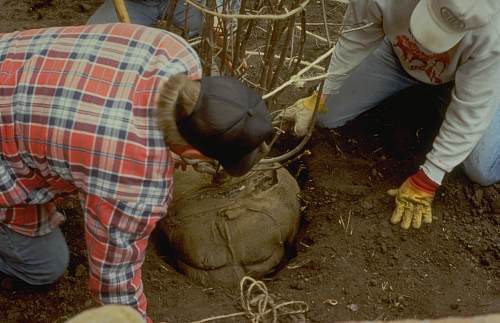
- Balled and burlapped trees and shrubs are dug with a firm ball of soil around the roots, and held securely in place with burlap, twine, and sometimes a wire basket.
- A broken, damaged or dry soil ball can result in serious damage to the roots. The stem should not wobble in the soil ball.
- B & B trees can be difficult to transport and plant without special equipment because of the weight of the soil ball.
- B & B stock is often the most expensive, but if handled and planted properly, is as reliable as container grown stock.
- Always lift B & B plants from beneath the ball, never by the stem.
- Plant B&B stock in spring, summer and fall.
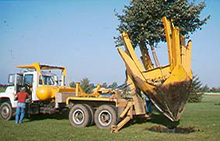
Larger plants are often moved with a tree spade, a machine that digs a mass of soil including the plant and some of its roots.
Benefits
- Tree spade may be the best option if a tree will otherwise be lost or if the value of the tree outweighs the moving costs.
- Spading also saves labor, planting time and years of maintenance of the juvenile tree.
- It eliminates the possible risk of mower damage that commonly occurs on younger, smaller trees.
Planning to use a tree spade
- The plant and root ball may stay in the machine until it is planted into a pre-dug matching hole, or it may be placed in a wire basket lined with burlap.
- The size of the root ball is critical and species dependent.
- Matching soils from the dig site to the planting site is important, as is compaction within the planting hole.
- Roughing up the sides of the hole can offset some of this compaction.
- Plants can be moved in most seasons with a spade.
- Plants dug in summer and early fall should have an oversized ball and receive special attention relative to species, condition, handling and irrigation.
- Many native trees that have grown in the wild should not be transplanted to open, exposed locations.
Tree spade sizes for deciduous and evergreen trees
| Tree spade size | Deciduous tree - trunk diameter | Evergreen tree - height |
|---|---|---|
| 44 inches | 2 to 3 inches | 5 to 7 feet |
| 66 inches | 3 to 5 inches | 7 to 10 feet |
| 92 inches | 6 to 8 inches | 12 to 15 feet |
Due to safety issues, and the complexity of the equipment and processes involved, it is strongly recommended that individuals hire an experienced contractor specializing in tree spading to transplant trees. An experienced machine operator can make the difference between success and failure.
Prior to planting with a tree spade, locate all utilities to prevent cutting through wires, cables, etc. Call the Gopher State utility location numbers as follows:
SAINT PAUL: 651-454-0002
MINNEAPOLIS: 612-454-0002
GREATER MINNESOTA: 1-800-252-1166
Make the call at no charge. It is better to be safe than sorry.
Preparation
- Take special care when transporting plants from the nursery.
- The proper vehicle, a truck or trailer, can reduce the risk of injury from loading and unloading.
- Protect leaves and needles from the sun and wind by wrapping or covering while in transit.
- Cushion stems and branches from injury.
- Always tie the plants down securely and avoid high speed travel.
Successful planting starts with proper site preparation. Digging the hole for a new plant is the first step.
- The hole should be at least 1-2 feet wider than the size of the root system (except for direct tree spade planted trees).
- Make the hole as wide or wider at the bottom than at the top.
- A larger hole will allow for better root growth, especially in poor soil.
- Roughen the sides of the hole with a shovel.
- Planting depth is critical.
- For compacted clay soils or poorly drained soils, plants should be planted at or slightly higher than the depth that they drew in the nursery.
- For B&B plants, plant the tree or shrub so that almost 1/3 of the height of the soil ball is above ground level after planting. This will improve oxygen availability to the roots.
- Allow for settling, especially if the hole has been dug deep and backfilled.
- Eliminate air pockets by watering during and after backfilling.
- Amend poor soils with organic material or loamy topsoil depending on the improvement needed.
- Do not use peat for poorly drained, clayey soils, as it can act as a sump and draw too much water into the planting hole.
- Never completely backfill with a soil amendment; only create a transition zone to the existing soil where the roots must eventually grow.
- Too much soil amendment can create moisture gradients and cause roots to be confined to the planting hole.
- Remove rocks and debris from the hole.
- Never put rocks or gravel in the bottom of the hole to improve drainage unless it is connected to a drain tile.
Planting
- Inspect the roots of the plant. Prune away any diseased or damaged roots or branches.
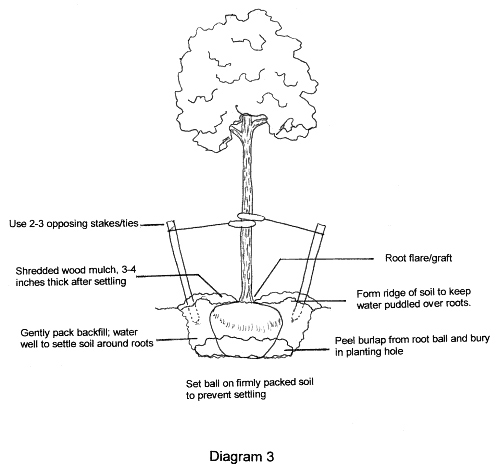
- Place the roots in the hole so that the soil surface will be at the same level where the plant was previously growing, as indicated by the slightly darker area of the trunk.
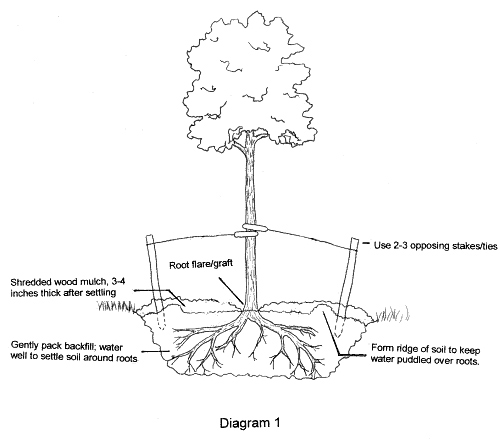
- Trees should be planted so that the graft or trunk flare is 1" above the soil surface.
- Form a mound or "cone" of soil on the bottom of the hole and spread the roots over the mound.
- Tamp the soil and center trees with the largest branches facing southwest.
- Backfill the soil into the hole a few inches at a time, firming the soil after each addition.
- While backfilling, be sure the plant remains vertical and be careful not to damage roots.
- Gently raise and lower the plant while adding soil to eliminate air pockets.
- Use water to settle the soil around the roots while backfilling.
- After backfilling is complete, form a ridge of soil around the edge of the hole to puddle and hold water around the plant.
- Place two or three 4-foot stakes around each tree approximately 10" from the trunk.
- Using a soft rope or tape made especially for tying trees, tie a piece of rope around the trunk to each stake.
- Stakes can be removed after the first growing season. It is usually unnecessary to stake shrubs.
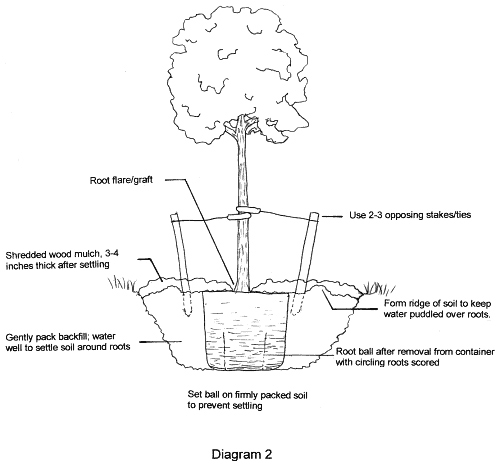
- Once the planting hole is prepared, lay the containerized tree or shrub on its side and gently slide the plant out of the container.
- It may be necessary to push on the sides of the container to loosen the root ball or cut the container.
- Remove all containers, including biodegradable pots.
- If roots are growing in a spiral around the soil ball, the plant is rootbound.
- Separate these roots or they will eventually girdle the plant.
- Make vertical cuts with a knife or pruning shears on the sides of the ball just deep enough to cut the net of roots.
- Make a criss-cross cut across the bottom of the ball.
- Pot-bound root systems - Part 1 (4:13)
- Pot-bound root systems - Part 2 (8:09)
- Place the intact root ball in the hole.
- Plant trees so that the graft or trunk flare is 1" above the soil surface. This is usually the same level at which the tree was growing in the container.
- Backfill the soil into the hole a few inches at a time, firming the soil after each addition. While backfilling, be sure the tree remains vertical.
- Form a ridge to hold water and stake and protect trees as described above under "Planting bare root and packaged stock."
- Do not plant evergreens later than October so the roots will have a chance to become established.
- Place the root ball into the hole so that the soil surface will be at the same level where the plant was previously growing, as indicated by the slightly darker area of the trunk.
- The root flare and the top of the ball will also show the original planting depth.
- Plant trees so that the graft or trunk flare is 1" above the soil.
- Cut the twine from the root ball and peel back the burlap and any metal basket or other material meant to hold the root ball together.
- It is not necessary to remove these materials from under the root ball. They can be pushed down along the sides of the root ball into the planting hole and buried.
- Be sure all parts of the burlap are buried well below the soil surface so that it does not wick moisture to the surface.
- Be sure to remove all twine from around the trunk of the tree or shrub to allow the plant room for growth.
- Take extra care not to loosen or break the soil ball. Backfill the hole one-third full, tamping to remove air pockets.
- Water slowly to saturate the soil ball and to remove air pockets in the backfill.
- Be sure the tree remains vertical.
- Finish filling the hole with soil.
- Form a ridge to hold water and stake trees as described above under “Planting bare root and packaged stock.”
- No burlap should remain above the soil surface as it may act as a wick and dry the root ball.
- Do not plant evergreens later than October so the roots will have a chance to become established.
- Water trees thoroughly before moving to hydrate the plant and to avoid soil sifting out during transport.
- The sides of the planting holes should be roughed up with a shovel, rake, etc., to break up compaction caused by the spade.
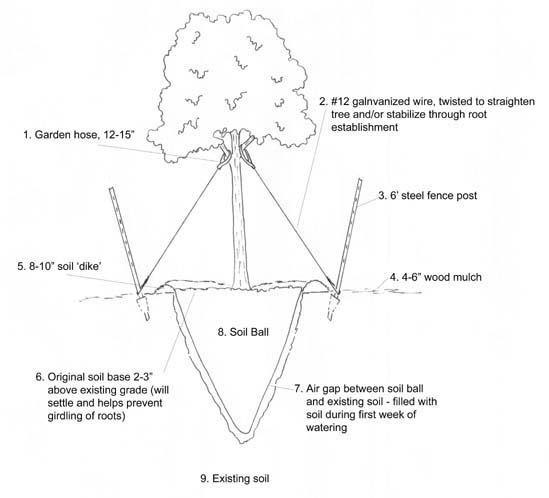
- Place trees two to three inches higher than the original grade to allow for settling.
- If possible, orient the tree in the same direction as its original location.
- After planting, work loose soil into the area between the hole and the tree plug.
- Stake the tree to provide support until the roots become established.
- Water newly planted trees regularly.
- Saturate the root ball to a depth of 12"
- If large air spaces are apparent between the soil ball and the surrounding soil, add additional soil during the initial watering.
After-planting care
- Apply 5-7 gallons to the root ball once a week for a newly planted tree or shrub.
- Differing soil and weather conditions will affect the frequency with which water must be added.
- Examine the soil moisture 4-8 inches deep to determine the need for water.
- If the soil feels dry or just slightly damp, watering is needed. Soil type and drainage must also be considered.
- Well-drained, sandy soil will need water more often than a clay soil that may hold too much water.
- A slow trickle of the garden hose at the base of the plant for several hours or until the soil is thoroughly soaked is the best method.
- Avoid short, frequent watering as this does not promote deep root growth.
Adding mulch around the base of the plant is a very important part of plant care. By mulching plants, a more favorable environment is provided for the tree roots. A mulch allows better infiltration of water, holds soil moisture, limits weed growth, and discourages injury from lawnmowers and weed whips.
- Wood and bark chips are good mulching materials.
- Do not use plastic under mulch as it can cause roots to suffocate.
- Conduct soil tests before planting to determine possible nutrient deficiencies that the plant may face.
- Apply a 2-3 inch layer of mulch, and spread to form a 6-foot diameter circle around the plant.
- Do not pile mulch up against the trunk. Pull mulch at least 4 inches away from the trunk.
- Fertilize newly planted plants every 2-3 years in the fall after the leaves have fallen or in early spring before growth begins.
- Apply it to the surface or place it in holes around the plants.
- Beware of burning turf if surface-applied.
- Water in surface applications.
- Do not apply nitrogen in late summer unless the plant is nutrient deficient, as this can promote new growth that may not harden off properly and can be damaged by winter weather.
- Apply phosphorus and potassium in the fall as they will enhance winter acclimation.
- Trees and shrubs do not need pruning immediately before or after planting.
- Most nurseries prune out co-dominant leaders, limbs that rub against each other, and poorly angled branches, prior to sale.
- If the nursery has not pruned these problems, remove them after planting.
- Some limbs may be damaged in transit from the nursery to the planting site. Inspect the plants and remove these limbs immediately after planting.
Most newly planted trees will do better without staking. Young trees standing alone with their tops free to move will develop stronger, more resilient trunks than those staked for several years. If a tree is unstable in a strong wind or is pushed over, then staking is required.
A common problem with staking trees is the girdling effect that the ties can have on the tree. Soft nylon webbing or carpet strips attached by grommets to a stake can reduce this damage. Often, wire is too tight around the trunk and will girdle and kill the tree.
Whatever material is used, be sure to allow for some movement. Remove the stakes and ties once the tree is established—usually after one year.
Proper winter care begins in the summer.
Watering and fertilization
- Proper watering and fertilization in spring and summer is required.
- Decrease watering in early fall and increase it in late fall to provide water needed to withstand the drying winds of winter.
- Plants need to go dormant. Do not encourage late growth by heavy watering and nitrogen fertilization in early fall.
- Thoroughly water plants in late fall just prior to the soil freezing.
Sunscald
- Sunscald, characterized by sunken, dried, or cracked bark, is caused by the heating effect of the winter sun in cold weather.
- It usually occurs on the south or southwest side of the tree
- In the fall, wrap young and thin-barked trees with commercial tree wrap from the bottom up to the first major branch. Remove the wrap in spring.
- Thin-barked species such as maples and honeylocusts may require protection for several years.
Winter browning
- The combined effects of wind and sun cause winter browning of evergreens.
- Trees lose water from the leaves or needles while roots are in frozen soil.
- To protect evergreens, place a screen of burlap or similar material on the south, west, and windward side of the tree to block wind and sun.
- Antidesiccant sprays are not very effective in offsetting the drying effects.
- Water evergreens well throughout the growing season, lightly in September, and then thoroughly again before the soil freezes.
- Select species and cultivars that tolerate winter conditions.
- Plant species susceptible to winter injury in areas of minimal exposure to winter wind and sun.
Animal damage
- Animal damage can be severe during the winter.
- To protect individual trees from mice, place a cylinder of 1/4-inch mesh hardware cloth or plastic drain pipe (it should not be black in color) around the trunk.
- The cylinder should extend high enough to prevent animals from feeding at snow level.
- Firmly anchor it in the soil without disturbing the tree roots.
- Protection from rabbits requires coverage of up to 1 to 2 feet above snow level.
- Other means of fencing or animal control may be needed.
- If many trees and shrubs are to be protected, application of a commercial repellent may be more practical.
- Spray or paint the repellent on the trunks and branches.
- The effectiveness and duration of the repellent will depend on the severity of the winter and the availability of other food.
Reviewed in 2021


