Quick facts
- Asparagus spears are the part of the plant that goes to harvest but the ferns, crowns and seeds are just as important.
- Select the right variety of asparagus for Minnesota's climate.
- Consider soil drainage, sunlight, soil texture, irrigation and soil pH when choosing a planting site.
- Following the steps outlined in planting a new asparagus crop will help ensure that your investment pays off.
Asparagus is a high-value perennial crop and plants can live and produce for more than 15 years in Minnesota. Although commercial production in the United States is concentrated in California, Washington and Michigan, Minnesota's climate and soils provide an excellent environment for growing asparagus. The demand for this crop is higher than the current in-state production.
Asparagus is the earliest crop to market, and growers can market it to restaurants, at farmers' markets, and through community-supported agriculture (CSAs) and roadside stands.
The cost to establish an asparagus field is substantial, so growers should have a robust management plan in place before planting.
How asparagus grows
Asparagus spears emerge each spring from underground buds. After the harvest season ends in late June, additional spears are allowed to grow into ferns that photosynthesize and accumulate carbohydrates that the plant uses to keep growing the following year. The plants are dormant from December to April in Minnesota and many varieties are known to overwinter well in our climate.
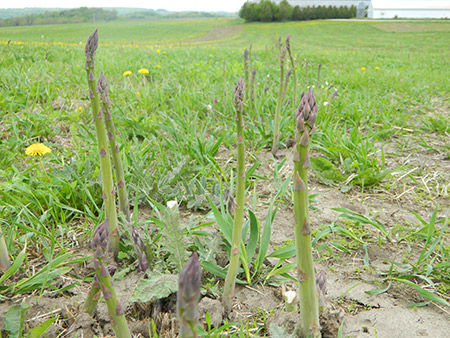
Spears
The edible part of the asparagus plant is called the spear.
- Spears are the newly emerged stems of the plant.
- Spears continually emerge from the underground buds on the crown of the plant for several weeks in the spring and summer.
Ferns
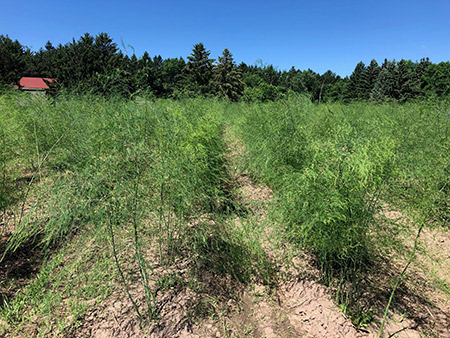
Spears that are not harvested will keep growing and turn into ferns. This happens at the end of each harvest season, and in newly planted asparagus stands that are not harvested.
- Ferns are an important part of asparagus production.
- They photosynthesize for several months following the spear harvest season, transporting energy to the crowns for storage over the winter.
- Healthier ferns give way to healthier plants and higher yields in subsequent years.
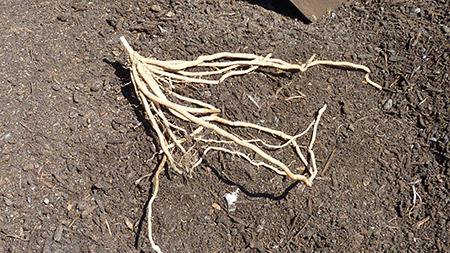
Crowns
The crown is the belowground part of the asparagus plant that includes roots, rhizomes and buds.
- The spears grow off of the buds during the growing season.
- During the dormant season (winter) the crowns store energy in the form of carbohydrates that allow the plant to keep growing from year to year.
- New asparagus fields are typically planted from small crowns, rather than planting them from seed.
Seeds
- Female plants produce small black seeds that can become weedy volunteer asparagus.
- Open-pollinated varieties of asparagus contain both male and female plants.
- Hybrid varieties are mostly all-male plants, so planting hybrids minimizes the issue of re-seeding.
Recommended asparagus varieties for Minnesota
Most asparagus growers plant hybrid varieties for their superior yields, uniform spear size, disease resistance and all-male plants. Open-pollinated varieties are also widely available at a lower cost per crown than the hybrid varieties. The yield of open-pollinated varieties is generally lower, and the size and quality of the spears is more variable.
Hybrid varieties for Minnesota
- Millennium
- Jersey Knight
- Jersey Giant
- Jersey Supreme
Open-pollinated varieties for Minnesota
- Mary Washington
- Martha Washington
- Purple Passion
Choosing a planting site for asparagus
Since asparagus is a long-lived perennial crop, proper site selection is important. While annual vegetable crops can be moved if the first planting site doesn’t work, asparagus cannot.
Site requirements for asparagus include:
- Good soil drainage. Do not plant in heavy or wet soil where water pools.
- Full sunlight.
- Medium textured soils (silt loam, loam, sandy clay loam, sandy loam). Avoid planting in heavy clay or very sandy soil.
- Access to irrigation, particularly in the planting year (especially important for sandy soils).
- Soil pH, ideally, between 6.5 and 7.0. Soils with a pH slightly above or below are not ideal, but can still be suitable for asparagus with liming or other amendments.
In addition to soil quality, the slope of the land also impacts soil water drainage. We recommend planting asparagus on a slight slope is recommended especially when heavier soils are present. Avoid planting asparagus in heavy clay soil.
Planting a new asparagus field
Following correct planting methods for asparagus is important for this long-lived perennial crop. Planting mistakes are costly because they can impact yield and crop health for years to come.
Growers planning a new asparagus field should prepare the field in the year prior to planting. Waiting to prepare until the planting year only works if the grower already knows that the field is well suited for asparagus and if nurseries still have crowns of the desired varieties available.
Field preparation involves:
- Soil testing.
- Amending the soil pH and organic matter based on the soil test.
- Reducing perennial weed populations.
- Measuring the field space.
- Planning the row spacing, row orientation and number of crowns needed.
- Ordering crowns.
- Crowns should be ordered 3-6 months before planting to ensure that preferred varieties are available.
- Select a delivery date close to when you anticipate planting, as the crowns must be refrigerated until planting.
- In Minnesota, asparagus is planted from early May to the first week of June.
If the soil test indicates phosphorus or potassium deficiencies, incorporate the first inorganic fertilizer or compost application in the fall or spring before planting.

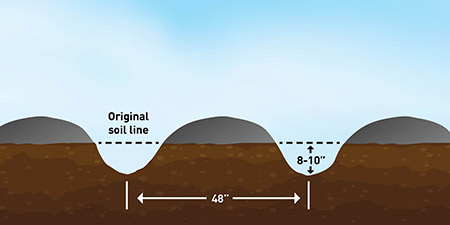
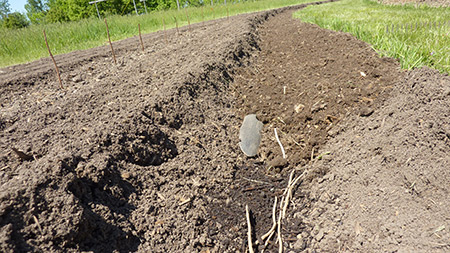
On the planting day, begin by digging furrows (trenches) for the crowns. These will become the rows that the crowns are planted into.
- Recommended between-row spacing is four feet.
- Rows can be spaced wider if needed to accommodate equipment.
- Rows should not be spaced closer than three feet, as the asparagus plants will widen as they mature, reducing walking space between rows.
- Dig the furrows to between 8-10 inches deep. In heavy clay soils, the furrow depth may be reduced to six inches, and in sandy soils, the depth may be increased to no more than 12 inches.
- Soil displaced from the furrow should be pushed to one or both sides so that it can be back-filled into the furrow after planting and throughout the first growing season.
Some Minnesota growers use custom equipment to dig furrows, while most others use a single-bottom plow or a potato hilling disk. Hand shovels are efficient for very small plantings.
Depending on labor, equipment and field size, you can plant the crowns as the furrows are being dug, with one person digging and one to two people following behind the tractor with the crowns.
All of the furrows may be dug before the first crowns are laid down. But that will dry the soil, making it clumpy and harder to work with.
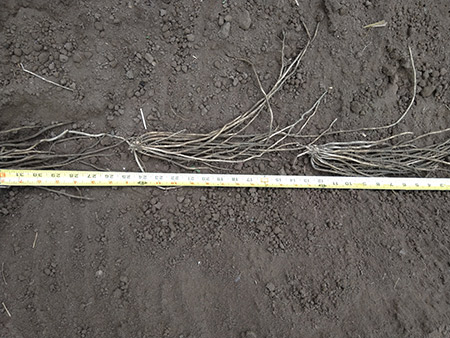
To plant the crowns, place them "head-to-toe" (bud-to-root tip) in the furrow as shown in the photo below. The recommended bud spacing is 12 inches. This spacing works well because many crowns have roots between about 8-12 inches long.
It is not necessary to spread out the roots around the bud of the crown. Some older growing guides recommend this practice, which is often referred to as an “octopus formation”, but it is time-consuming, and research does not support the claim that it leads to improved plant health or vigor.
- Immediately after laying the crowns in the furrows, cover them by back-filling the furrow with 2-3 inches of soil.
- Prolonging the time between planting and covering can cause the roots of the crowns to dry out.
- It is important to cover the crowns with soil very soon after planting.
- It is best if the soil used to back-fill still has good moisture.
- Irrigate after planting.
- After planting, there should still be plenty of soil along the sides of the furrows, which will be used later in the season to continue back-filling the furrows as the ferns grow.
- Small, narrow spears will start to emerge from the soil within 2-3 weeks of planting, depending on precipitation, temperature and amount of soil cover.
- Once the spears are sturdy and several inches tall, 3-4 more inches of soil can be back-filled into the furrow. Use caution with this step, as large clods of dry soil can break the brittle spears.
- By August, all of the displaced soil should be placed back into the furrow so the soil is level.

Reviewed in 2023