Quick facts
- Review your state’s regulations on livestock carcass disposal.
- When managed properly, composting can be an environmentally-friendly and low-cost option for carcass disposal.
- Routinely check piles for cracks or exposed carcass and cover as needed.
- Check pile temperatures daily for 10 days after construction and turning.
- Turn the pile when temperatures steadily decline below 130 F.
Why should you compost a horse carcass?

In Minnesota, the Board of Animal Health has approved four methods for disposing of horse carcasses including rendering, burial, cremation and composting. Limited rendering availability, high cremation costs, and the practicality of burial can make disposing of horse carcasses challenging.
Carcass disposal is important since improper carcass disposal can harm the environment and ecosystem. Another option horse owners should consider is composting.
Composting refers to the managed breakdown of organic material, such as a horse carcass, into finer particles by microbes. You can use the end product of carcass composting as a soil addition in agricultural fields or flower gardens. When managed properly, composting can be an environmentally friendly and low-cost option for carcass disposal.
Review state regulations
Many states provide regulations for the disposal of livestock carcasses. Your state guidelines can help you decide if horse carcass composting is right for your farm and will better prepare you for composting.
In Minnesota, the Board of Animal Health regulates livestock carcass disposal. For more information on state guidelines and preparing a compost site, contact the Minnesota Board of Animal Health at 651-296-2942.
Ingredients for a carcass compost pile
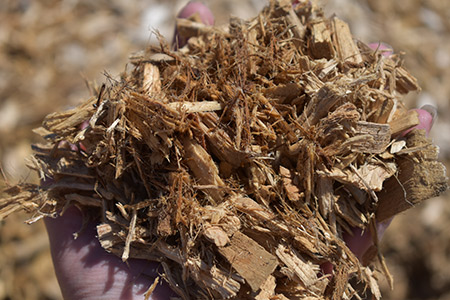
The base of a compost pile should consist of a coarse carbon material such as playground wood chips or chopped corn stalks. The base provides airflow through the pile and prevents leaching as the carcass breaks down.
The microbes that break down the carcass need oxygen to thrive. Using a bulky material mixed with finer material for the base will allow oxygen to enter the bottom of the pile and move upwards.
A fine material such as pure sawdust will likely pack together and limit airflow through the pile. In contrast, extremely bulky materials, such as wood particles over six inches long will provide too much airflow, which can dry out or cool the pile.

Aside from a coarse carbon material, you will also need clean, dry wood shavings. Wood shavings will absorb fluid from the carcass during composting and further prevent leaching from the pile.
Medium-flake, pine shavings, commonly used for stall bedding, work well.
Prior to composting a horse carcass, you should remove any noncompostable objects including halters and horseshoes. Metal cannot be composted and may damage equipment when applying the final compost product to fields.

You will need an absorbent, bioactive material for covering the carcass and creating a biologically active pile. A mixture of two-parts horse stall waste to one-part cattle manure by volume works well for this purpose.
While preparing the mixture, be sure to check the moisture level by performing a squeeze test. Using a gloved hand, squeeze the mixture in the palm of your hand.
- The material should be moist enough to form a ball with only some liquid present.
- If the material crumbles apart, it is too dry. Adding more cattle manure typically increases the moisture content of the mixture.
- If excess liquid runs out, it is too wet. Adding more horse stall waste will likely make the mixture drier.
The manure mixture will increase biological activity, provide energy and maintain moisture in the pile. An important function of the manure mixture when covering the carcass is to control odor and discourage wildlife from visiting the pile.
During the composting process, volatile organic compounds form and cause odor when released from the pile. Carbon present in the cover material will bind to these compounds and trap them inside the compost pile. As a result, when constructed properly, odor and wildlife activity should be minimal around compost piles.
Steps for constructing a compost pile

When constructing a compost pile, start with a base layer of coarse carbon material such as wood chips. This layer should be between 18 to 24 inches deep, 14 to 18 feet long, and 12 to 15 feet wide.
The length and width will depend on the size of the carcass. There should be 18 to 24 inches of space around the carcass to the edge of the base.
To maximize airflow through the base:
- Avoid stepping or driving on the base layer during construction.
- Use a rake or shovel to square the edges of the entire base. Leaving a tapered edge will limit the amount of air that can travel into the base.
- Avoid exceeding a width of 15 feet.

Add three to four inches, about 12 cubic feet, of clean, dry wood shavings. Keep the wood shavings toward the center of the pile, where you will eventually lay the carcass.

Place one to two inches of the prepared manure mixture over the wood shavings. This thin layer of manure will help start biological activity below the carcass and aid in the breakdown process.
Once the base is constructed and you have added a thin layer of manure mixture, you can gently lay the horse carcass out flat on the center of the pile. The carcass may face any direction as long as there is 18 to 24 inches of space around the carcass to the edge of the base.
The space will allow the cover material to cascade over and surround the carcass without completely burying the base. Some cascading of the cover material over the base will occur and is okay.

Use the manure mixture of 2:1 horse stall waste to cattle manure to cover the carcass to a depth of 18 to 24 inches. Use a probe and measuring tool to make sure the depth to the carcass is adequate.
The cover material will control odor and prevent wildlife activity around the pile. Creating a domed peak will help the compost pile shed rainwater. The final height of the compost pile should be between five and seven feet.

This image is a visual representation of the steps to build a horse carcass composting pile as described on this page.
Managing a horse carcass compost pile

Depressions and cracking will occur along the peak of the compost pile within a week of construction due to the collapse of the carcass. If left unaddressed, the cracks will release odor and attract wildlife, domestic animals and insects.
To avoid odor and pests, it is best to check the compost pile routinely and fill in all cracks and depressions with capping (manure mixture) material. You can do this by raking over existing material or by topping off the pile with additional capping material. Be sure to re-cover any parts of the carcass that become exposed.
Continue to monitor the compost pile throughout the process for any additional cracks or carcass exposure.

Temperature is a key indicator of a compost pile’s functionality. As microbes break down organic matter within the compost pile, they produce heat. Routine monitoring of temperatures can help you assess activity within the compost pile and detect possible problems.
In Minnesota, compost pile temperatures must be checked and recorded daily. You can check compost pile temperatures by using a 36-inch stem thermometer. We recommend checking the temperature in at least two locations of the pile, at depths of 18 and 36 inches. Record these temperature readings and repeat this practice in the same locations daily for the first 10 days and periodically thereafter.
Ideal temperatures for composting
Compost pile temperatures should quickly reach between 130 and 150°F within the first week following construction. Temperatures within this range support the primary microbes responsible for composting while killing pathogens. In Minnesota, compost piles must complete two heating cycles, where temperatures reach at least 130 °F and are maintained for 7 to 10 days. These sustained heating periods are essential to disease control and breaking down of the carcass.
Moisture
If a compost pile does not heat within the first week, you may need to check the pile’s moisture. The main sources of moisture for a compost pile include the carcass and the capping material, which is generally a bioactive manure mixture. Moisture is key to supporting biological activity and should be checked routinely using the squeeze test.
- When squeezed in the palm of your hand, the compost should be moist but not wringing wet or crumbly.
- If the compost is crumbly, you may need to add water to the pile to increase moisture.
- Piles that are too dry will have little activity and will not heat properly.
- If the squeeze test results in excess liquid, the compost pile is too wet.
- When a compost pile is too wet, microbial activity and temperatures will decline due to limited oxygen availability.
- To correct this problem, you can add or rake in dry, fine carbon materials, such as wood shavings to help absorb excess moisture.
It is easier to correct a compost pile that is too dry than one that is too wet. Therefore, when building a pile make sure to check the moisture of your materials using the squeeze test and err on the dry side. You can always add water if needed.
Leachate
- Properly constructing a compost pile will help prevent leaching.
- If you notice leaching from the pile, place an absorbent material such as dry wood shavings around the base to absorb liquid and nutrients.
- You can then mix in this material when you turn the pile.
- Leachate is most likely to occur within a week of construction.

When temperatures steadily decline below 130°F, the pile is ready for turning. Turning generally takes place between 7 and 9 weeks after construction to ensure most of the carcass has already broken down.
- Using a skid loader or small tractor, thoroughly fluff and mix the entire pile.
- After the compost materials have been mixed, reform a mound-shaped pile.
- Check the pile for any exposed bones or carcass parts and cover them to prevent odor and attracting pests and scavengers.
Following turning, the compost pile should reheat within a week to temperatures over 130°F. Turning a compost pile is key to redistributing nutrients to the microorganisms and introducing oxygen back into the pile. As a result, microbial activity increases and results in reheating and further breakdown within the pile.


Pile temperatures will remain over 130°F for over a week after turning. Once microbial activity slows down, temperatures will begin to steadily decline below 130°F.
Curing refers to the cool phase (less than 110°F) of composting that takes place for 4 to 5 months after turning.
- During this phase, the compost materials further break down into a dark, humus-like product.
- Harmful compounds such as ammonium break down and become more stable.
- After curing, the compost will be more uniform with only some larger bones such as the femur, skull and vertebrae remaining.
Uses of horse carcass compost
Composting is a process that naturally recycles nutrients. Soil nutrients play a key role in supporting animal and plant life. Composting animals and plants at the end of their lifecycle allows you to return nutrients to the soil to support new life. You can use finished compost as a soil amendment on your farm to improve soil health, nutrient content, and water holding capacity. Compost may also replace the need for some commercial fertilizers.
You can use finished compost as a soil amendment for pastures, crops, flower gardens, and even trees. Once you select a use for your compost, you should develop a nutrient management plan to help you keep track of nutrient use and guide future decisions. Be sure to answer the following in your plan:
- What are the nutrient needs of the plants you want to fertilize?
- What nutrients are currently present in the soil?
- What nutrients are present in the compost?
- How much compost will you need to apply to meet the nutrient needs of your plants?
Taking soil and compost samples for nutrient analysis can help you answer these questions.
How to take a soil sample
Soil sampling will vary based on the area you plan to apply compost. The following resources discuss how to take soil samples and submit them for laboratory analysis.
How to take a compost sample
Nutrient content of a compost pile varies from one spot to another. To collect a good sample:
- Thoroughly mix the finished compost pile prior to sampling.
- Use a shovel and gloved hands to collect several compost samples from different areas of the pile.
- Place the samples in a bucket and thoroughly mix them.
- Take a subsample from the bucket and place it in a gallon-sized sealable plastic bag. Be sure to remove any air from the bag before sealing.
- Label the bag with a permanent marker and include: your name, type of sample, date of sampling, and any other information required by the laboratory.
- Use a second sealable plastic bag to double bag your sample.
- Place the sample in a freezer or bring it to a compost testing laboratory right away.
Finished horse carcass compost may still contain large bones. While using or spreading compost, remove any remaining bones. You can place bones in an active compost pile or bury them for further breakdown. Large bones left in finished compost and applied to hay fields may damage hay equipment and be accidentally included in baled hay.
Applying finished compost is similar to applying manure to crop fields and pastures. Before applying compost to fields or pastures, review your state’s regulations and follow timing and setback requirements for protecting water sources. For more information on Minnesota guidelines, see Minnesota Pollution Control Agency.
When applying compost to pastures, only a thin layer should be spread. Since tillage can not be used to incorporate compost in a pasture, a thick layer can result in poor grass growth or horses refusing to graze in areas where compost is spread.
If you can not use compost on your property, others may be interested in using it. Compost is often more desirable than raw manure because it has fewer odors and is easier to transport and spread on fields. Check with local farmers or commercial waste haulers to see if they can remove your compost. There will usually be a fee for these services.
FAQs on horse carcass composting
Pentobarbital is the most commonly used euthanasia drug for horses. Improper carcass management, such as abandoning a carcass, can lead to pentobarbital poisoning of wildlife and domestic animals. When properly constructed and managed, horse carcass compost piles do not attract wildlife or domestic animals and have a low risk of leaching. Pentobarbital persists in horse carcass compost piles at low levels following 7 months of composting. Further research is needed to determine the environmental impact of pentobarbital in finished compost.
The cost of horse carcass composting mainly depends on the type and availability of carbon sources used. Playground wood chips are a suitable base material for carcass composting and may be sourced from a local forest product company. On-farm carbon sources such as chopped corn stalks can also be used in composting and offer more economical options. When using playground wood chips and pine shavings to compost a 1,000-pound carcass, carbon sources, including delivery, were about $260.
Additional costs of carcass composting include site preparation and equipment. Refer to your state’s regulations for compost site requirements. In Minnesota, compost piles must be constructed on an impervious weight-bearing pad such as concrete or compacted gravel. The cost of a pad depends on the materials used. Lastly, composting requires the use of a skid loader or tractor with a bucket to manage the pile.
You can turn your compost pile into a windrow and continue to add carcasses as needed.
- To limit the amount of materials used, remove about 24 inches of manure mixture (e.g., two parts horse stall waste to one part beef manure by volume) to uncover the base of an existing pile. Keep at least 5 inches of manure mixture over the carcass currently in the pile.
- Add carbon materials to extend the original base and provide space for the next carcass.
- Place the carcass against the first carcass. The back of the added carcass may overlap the legs of the first carcass.
- Make sure at least 24 inches of base materials extend beyond the carcass to the outside of the windrow.
- Cover and surround the carcass with at least 24 inches of manure mixture.
- Repeat these steps to expand a windrow with additional carcasses.

A properly constructed and managed carcass compost pile has a low risk of wildlife disturbance. You should cover and surround the carcass with at least 24 inches of a manure mixture when constructing a pile. The manure mixture serves to trap odors within the pile and helps to prevent wildlife scavenging and pests, such as flies. A properly functioning carcass compost pile should not produce off-putting smells, attract flies, or be scavenged by wildlife and pets.

You can compost a horse carcass any time of the year. During winter months, composting works best when the carcass is not frozen. If available, use a warm, fresh manure mixture or hot active compost to cover the carcass after placing it on the carbon base. These materials will help start the compost process. If you do not have hot active materials available, you can construct the compost pile with cool materials, such as stockpiled manure or finished compost. When using cool materials to compost in the winter, the compost process will not start until the carcass thaws in the spring. Regardless of materials used, covering the carcass with an additional 6 to 12 inches (30 to 36 inches total) of material can help insulate the compost pile and sustain warm temperatures during winter months.
Following six months of composting, large bones such as the pelvis, skull, and femur will still remain. You should remove large bones prior to spreading the finished compost product on agricultural fields. Most of the smaller bones will fully break down within six months. Smaller bones present at the end of the compost process will likely be soft and brittle. Remaining bones may be added to other active compost piles for further breakdown or buried.
Collecting survey data
Horse owners are seeking other carcass management methods due to challenges with burial, rendering, and cremation. Carcass composting offers horse owners another option, but few use this practice in the horse industry. We asked horse owners and veterinarians to complete a survey on euthanasia and carcass management practices to better understand industry perception of composting.
Surveys were available online from September 3 to 27, 2019. The surveys consisted of no more than 35 questions regarding demographics, euthanasia practices, and carcass management methods, specifically composting.
Horse owner survey results
We received 1,225 responses for the horse owner survey.
Euthanasia and disposal practices
Eighty-six percent of respondents preferred chemical euthanasia over gunshot (11 percent) and captive bolt (3 percent). Respondents that preferred chemical euthanasia tended to prefer burial (58 percent) over other management methods including composting (10 percent).
Only 12 percent of respondents had ever used carcass composting. Respondents that hadn’t used composting indicated limited knowledge of composting, feasibility, and emotional distress were the main reasons. Fifty-nine percent of respondents indicated they were not familiar with carcass composting.
When asked if they would be willing to try carcass composting:
- 21 percent responded yes, through a commercial service
- 15 percent responded yes, on their own property
- 45 percent responded maybe
- 19 percent responded no
Horse owners were 8 times more likely to consider carcass composting if more research were available, and 2 times more likely if they were more familiar with composting. Respondents perceived cost and environmental impact as the main benefits of carcass composting.
Veterinarian survey results
We received 244 responses for the veterinarian survey.
Euthanasia and disposal practices
When asked what euthanasia practice they prefer:
- 84 percent preferred barbiturate overdose (pentobarbital)
- 6 percent preferred intrathecal lidocaine
- 2 percent preferred gunshot
- 1 percent preferred potassium chloride
- 1 percent preferred captive bolt
- 6 percent preferred other practices
Veterinarians preferred pentobarbital due to convenience and perceived low emotional distress for horse owners. Most veterinarians indicated they felt confident using intrathecal lidocaine in the absence of pentobarbital.
Veterinarians that preferred pentobarbital, most frequently recommended burial for carcass management. Recommendations for burial were mainly due to perceived convenience for the horse owner. Only 25 percent of respondents had ever recommended carcass composting. Respondents that had not recommended composting indicated limited knowledge of composting and lack of a commercial facility were the main reasons. Fifty-one percent of respondents indicated they were not familiar with carcass composting.
When asked if they would be willing to recommend carcass composting:
- 36 percent responded yes
- 25 percent responded yes, if a commercial service were available
- 24 percent responded maybe
- 2 percent responded no
Sixty-seven percent of veterinarians would be more open to recommend composting with more research. Respondents perceived cost and environmental impact as the main benefits of carcass composting.
Funding for this project was provided by the Rapid Agricultural Response Fund, established by the Minnesota Legislature and administered by the University of Minnesota Agricultural Experiment Station.
Special thank you to the horse owners who graciously provided their horses to further education and research on horse carcass composting.
Reviewed in 2024