Quick facts
- Adding compost to light, sandy soil helps it hold moisture and nutrients.
- Adding it to heavy soil improves drainage.
- Contain your compost in some type of structure 3 to 5 feet wide.
- Put your compost pile close to where you will use it.
- Away from drying winds, but in partial sunlight to help heat the pile.
- Do not compost pet feces, meat, bones, grease, whole eggs and dairy products.
- Do not compost diseased or insect-infested plants and weeds.
Composting is a process that allows naturally occurring microbes to convert yard waste, such as leaves and grass clippings, to a useful organic soil amendment or mulch.
Gardeners have used compost for centuries to improve their soil and help plant growth. Incorporating compost into light, sandy soil helps it hold both moisture and nutrients while adding it to heavy soil improves drainage.
Different yard waste conditions affect how well you compost. The microorganisms responsible for decomposition need oxygen, water and nitrogen.
Particle size also affects efficiency. The smaller the plant pieces, the more rapidly they will break down. Use a shredder or power mower to chop up leaves and small twigs before adding them to the pile.
Composting considerations
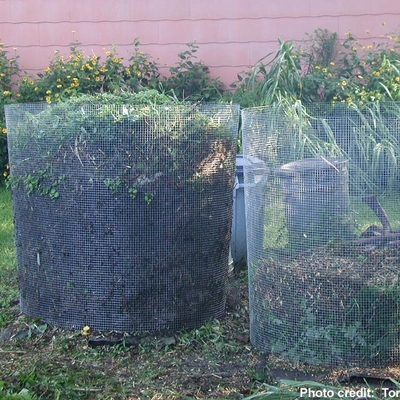
To save space, keep your yard looking neat and speed up composting time, contain your compost in some type of structure.
Unenclosed compost piles are uncommon in an urban setting since they usually spread out and become unsightly. Enclosing your compost pile in a structure keeps materials from blowing away. It also encourages faster and more thorough composting because the outer portion of the pile acts as an insulator that creates higher temperatures near the center.
The style of structure depends on how much space and compostable material you have available. There are many types of manufactured structures available through garden centers or mail-order catalogs. You can also build one yourself.
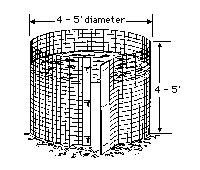
The goal is to hold your compostable materials in a cylindrical or cubical mass that is about 3 to 5 feet in each direction. Smaller sizes do not create enough heat, and larger sizes do not allow enough penetration of air and water. There should be openings to allow for the addition of water or removing finished compost.
You can build the structure from cement blocks, brick, wood, woven wire fencing, metal posts or other materials. Wood should be rot resistant or pressure treated with a wood preservative. Avoid timbers treated with creosote or pentachlorophenol.
Wire fencing or snow fence composting bin
- Multiply the diameter you want by 3.14 to determine the length of fence needed.
- Fasten with wire or three to four chain clips.
- When you need to turn the pile, peel the fence away and set it up nearby.
- Turn the compost into the structure in its new location.
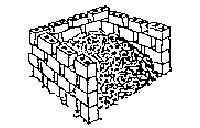
Cement block and brick composting bin
- Lay the cement blocks or bricks without mortar, leaving spaces between blocks to permit aeration.
- Build a three-sided, square or three-bin unit.
- If located near areas where children play, the unstable nature of loosely stacked blocks or bricks may make this structure an inappropriate choice.
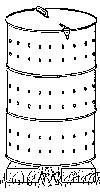
Barrel composter
- Use a 55-gallon drum.
- Drill six to nine rows of one-half inch holes over the length of the barrel to let air circulate.
- Fill three-fourths-full of material.
- Every few days lay it down and roll it over a few times to mix.
- Use a barrel that you have not used previously for toxic substances.
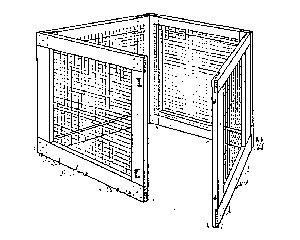
Portable wood and wire composting bin
- This unit is very flexible. It works well in small spaces as a holding unit for yard wastes or as a portable turning unit for kitchen and yard wastes.
- The unit is easily movable for turning piles or building a new one. Simply undo the latches, pull the sides apart and move it.
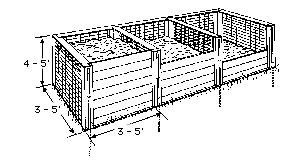
Three-chambered composting bin
- The three-chambered bin is a very efficient and durable structure for fast composting.
- It holds a considerable amount of compost, and allows good air circulation.
- The three-chambered bin works like an assembly line, having three batches of compost in varying stages of decomposition.
- Start the compost material in the first bin and allow it to heat up for three to five weeks.
- Next, turn it into the middle bin for another four to seven weeks, while you start a new batch of material in the first bin.
- Last, turn the material in the middle bin into the last bin as finished or nearly finished compost.
Locate your compost pile close to where you will use it to avoid interfering with yard activities or offending neighbors. The pile will work best in a location that is away from drying winds, yet receives partial sunlight to help heat the pile.
Many organic materials are compostable besides grass and leaves:
- Coffee grounds
- Eggshells
- Faded flowers
- Fruit and vegetable scraps
- Lake plants
- Leftover plants at the end of the gardening season
- Nonwoody shrub trimmings or twigs less than one-fourth inch in diameter
- Shredded newspaper (black and white print)
- Small amounts of wood ash and sawdust
- Straw
- Weeds
Sawdust requires the addition of extra nitrogen. Wood ash raises compost alkalinity and may result in nitrogen loss from the pile.
There should be little need to compost grass, since it is safe to leave clippings on the lawn if you mow regularly and remove only one-third of the blade length each time. If you do compost grass, mix it with other yard waste. Grass clippings pack down and restrict airflow. This limits the availability of oxygen needed by microorganisms for decomposition.
There are things that you should not compost. Pet feces can transmit diseases. Meat, bones, grease, whole eggs and dairy products attract rodents and other animals. Badly diseased or insect-infested plants and weeds containing seed may not heat up enough for decontamination.
- Build your compost pile in layers. Begin with eight to ten inches of leaves, grass or plant trimmings.
- Water it to the point of being moist, but not soggy.
- Add a nitrogen source, such as ammonium nitrate, ammonium sulfate or an inexpensive high nitrogen lawn fertilizer without herbicide.
- Sprinkle the pile with one-third to one-half cup of fertilizer per 25 square feet of surface area (a 5' x 5' bin).
- If you live in a rural area and have access to livestock manure, you can use a two-inch layer of manure as your nitrogen source.
- You may choose to add a one-inch layer of soil or completed compost over the nitrogen to increase the number of decomposing microbes in the pile. Most leaves and plant scraps have enough microorganisms to get the job done without the addition of soil or compost.
- Repeat these layers until the pile reaches a height of five feet, watering each time you add new layers.
- It is usually not necessary to add lime to your compost pile to improve the breakdown of most yard wastes. Finished compost is usually slightly alkaline.
- If you add lime during the decomposition process, it will probably be too alkaline when completed.
- If your pile contains large amounts of acidic materials such as pine needles or fruit wastes, you might add lime, but no more than one cup per 25 cubic feet of material.
- Excessive lime application can lead to loss of nitrogen from the compost pile.
- An active compost pile will heat to somewhere between 130° and 160° Fahrenheit.
- As the center cools, turn the pile to help speed decomposition and reduce any foul odors. Do this once or twice a month.
- Continue to water your compost pile periodically to keep it moist but not soggy.
- You can add a little fresh material when you turn the pile, but generally, you are better off beginning a new pile.
- A well-managed compost pile will be ready in two to four months in the warm season, whereas an untended pile will take a year or more to decompose.
- When completed, your compost pile will be about half its original height, and will have a pleasant, earthy smell.
Composting and mulching (2000; PDF) — This guide explains the processes of composting and mulching. It gives instructions for building and maintaining a compost pile and for using compost in yards and gardens.
Reviewed in 2018


