Understanding spring wheat growth and development is essential to achieving optimum productivity.
Spring wheat proceeds through a sequence of easily recognizable growth stages that are described by several staging schemes, the most comprehensive being the Zadoks system. Growing conditions and management decisions at any stage can impact the crop’s ultimate performance.
How spring wheat develops
Wheat (Triticum aestivum L.) can be classified as winter or spring growth habit based on flowering responses to cold temperatures.
Winter vs. spring wheat
Winter wheat development is promoted by seedlings’ exposure to temperatures in the 38 to 46 degrees Fahrenheit (3 to 8 degrees Celsius) range. These types are usually planted in the fall, which exposes the seedlings to cold temperatures during late fall and winter.
Spring types, however, don’t require exposure to cold temperatures for normal development and can be planted in spring.
Both winter and spring types, when properly grown in Minnesota, head in the late spring or early summer and mature by mid- to late-summer.
This webpage’s description of wheat development applies mostly to spring wheat, although all cereals have similar basic development patterns.
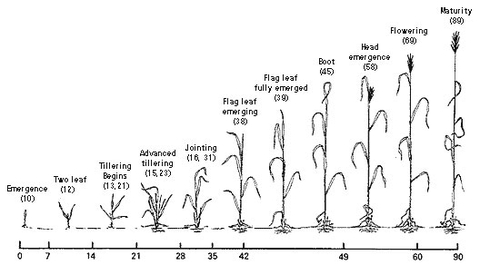
Figure 1 shows major developmental stages in spring wheat and approximate time intervals between them in Minnesota. A difference in maturity may exist among varieties or between seasons.
Growth staging systems
A number of staging systems have evolved for describing wheat development. We describe the Zadoks system, which is becoming the most universally accepted, in detail. In addition, we introduce the Haun and Feekes-Large staging systems.
The Zadoks system applies to any small grain and its stages are easy to identify in the field. It’s more detailed than other systems and allows for precise staging.
The two-digit code system
The first digit of this two-digit code shown in Table 1 refers to the principal stage of development beginning with germination (stage 0) and ending with kernel ripening (stage 9). The second digit between 0 and 9 subdivides each principal growth stage. A second digit value of 5 usually indicates the midpoint of the principal stage. For example, a 75 refers to medium milk stage of kernel development.
Seedling stage
In seedling growth, principal growth stage 1, the second digit refers to the number of emerged leaves. To be counted, a leaf must be at least 50 percent emerged.
A 13, for example, indicates that three leaves are at least 50 percent emerged on the main shoot. Do not count tiller leaves.
For the purposes of herbicide application, the seedling stage (stage 1) identifying the leaf numbers is useful.
Tillering stage and beyond
For the tillering principal stage (stage 2), the second digit indicates the number of emerged tillers present on the plant.
Combining stages
Because stages may overlap, it’s possible to combine Zadoks indexes to more completely describe a plant's appearance. For example, a plant with one tiller and three leaves could be described by either or both of the Zadoks stages 13 and 21 (Figure 1).
As the plant matures, the Zadoks stages describing kernel development are usually used alone.
The Haun system is mainly concerned with the leaf production stage of development.
The length of each emerging leaf is expressed as a fraction of the length of the preceding fully emerged leaf. For example, a 3.2 indicates that three leaves are fully emerged, and a fourth leaf has emerged two-tenths of the length of the third.
Although this system can be modified, it’s not as useful when making decisions using development indicators other than leaf numbers.
The Feekes-Large system has been widely used, but is becoming less popular. It numerically identifies stages such as tillering, jointing and ripening, but lacks the more detailed attributes of the Zadoks and Haun systems.
Table 1 shows stages of the Feekes scale next to the corresponding Zadoks stages.
Table 1. Zadoks growth staging system and corresponding Feekes code.
| Zadoks code: Principal stage |
Zadoks code: Secondary stage |
Description | Corresponding Feekes code |
|---|---|---|---|
| 0 | Germination | ||
| 0 | Dry kernel | ||
| 1 | Start of imbibition (water absorption) | ||
| 5 | Radicle emerged | ||
| 7 | Coleoptile emerged | ||
| 9 | Leaf just at coleoptile tip | ||
| 1 | Seeding development | 1 | |
| 0 | First leaf through coleoptile | ||
| 1 | First leaf at least 50 percent emerged | ||
| 2 | Second leaf at least 50 percent emerged | ||
| 3 | Third leaf at least 50 percent emerged | ||
| 4 | Fourth leaf at least 50 percent emerged | ||
| 5 | Fifth leaf at least 50 percent emerged | ||
| 2 | Tillering | 2 | |
| 0 | Main shoot only | ||
| 1 | Main shoot plus one visible tiller | ||
| 2 | Main shoot plus two tillers | ||
| 3 | Main shoot plus three tillers | ||
| 4 | Main shoot plus four tillers | ||
| 5 | Main shoot plus five tillers | 3 | |
| 3 | Stem elongation | ||
| 1 | First node detectable | 6 | |
| 2 | Second node detectable | 7 | |
| 3 | Third node detectable | ||
| 7 | Flag leaf just visible | 8 | |
| 9 | Flag leaf collar just visible | 9 | |
| 4 | Boot | ||
| 1 | Flag leaf sheath extending | ||
| 3 | Boot just beginning to swell | ||
| 5 | Boot swollen | 10 | |
| 7 | Flag leaf sheath opening | ||
| 9 | First awns visible | ||
| 5 | Head emergence | ||
| 1 | First spikelet of head just visible | 10.1 | |
| 3 | One-fourth of head emerged | 10.2 | |
| 5 | Half of head emerged | 10.3 | |
| 7 | Three-fourths of head emerged | 10.4 | |
| 9 | Head emergence complete | 10.5 | |
| 6 | Flowering | ||
| 1 | Beginning of flowering | 10.5.1 | |
| 5 | Half of florets have flowered | 10.5.2 | |
| 9 | Flowering complete | ||
| 7 | Milk development in kernel | ||
| 1 | Kernel watery ripe | 10.5.4 | |
| 3 | Early milk | ||
| 5 | Medium milk | 11.1 | |
| 7 | Late milk | ||
| 8 | Dough development in kernel | ||
| 3 | Early dough | ||
| 5 | Soft dough | 11.2 | |
| 7 | Hard dough, head losing green color | ||
| 9 | Approximate physiological maturity | ||
| 9 | Ripening | ||
| 1 | Kernel hard (difficult to divide with thumbnail) | 11.3 | |
| 2 | Thumbnail cannot dent kernel, harvest ripe | 11.4 |
Growth and development
Wheat’s growth cycle has the following divisions: Germination, seedling establishment and leaf production, tillering and head differentiation, stem and head growth, head emergence and flowering and grain filling and maturity.
Germination
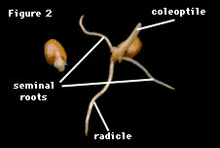
When a kernel is sown, the germination process begins. The radicle and seminal roots first extend, followed by the coleoptile (Figure 2).
Roots can be initiated from several positions on the seedling, both at the level of the seed and at the crown. The crown is usually separated from the seed by a sub-crown internode. The length of this internode increases as the depth of planting increases.
Leaf production
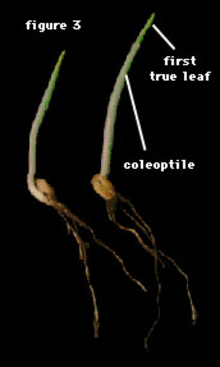
As the coleoptile emerges from the soil, its growth stops and the first true leaf pushes through the tip (Figure 3).
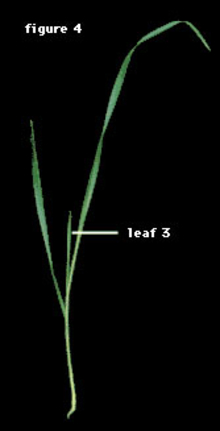
After seedling emergence, leaves produce at a rate of about one every four to five days. Figure 4 shows a young seedling at the 2-leaf stage.
A total of eight or nine leaves are usually produced, with later maturing varieties producing the larger number. Emergence of the last leaf – called the flag leaf – is an important stage for timing the application of certain plant growth regulators.
Tillering is an important development stage that allows plants to compensate for low plant populations or take advantage of good growing conditions.
Forming tillers
Tiller appearance closely coordinates with how leaves appear on the main shoot. Tillers can form at the attachment points of the coleoptile and the lower leaves on the main shoot.
The number of tillers formed depends on the variety and growing conditions. Under usual field conditions, a plant may produce three tillers in addition to the main shoot, although not all will necessarily produce grain.
Plants also can produce tillers from tillers – called secondary tillers – if the plant isn’t crowded or is heavily fertilized. Tillers that appear when the fourth, fifth and sixth leaves emerge on the main shoot are most likely to complete development and form grain.
Tillers that form later are likely to abort without producing grain. Tillers that produce more than three leaves and initiate their own root system are most likely to survive. The proportion of initiated tillers that abort differs with the variety and can increase if the crop encounters stressful conditions.
Initiating heads
As tillering occurs, another less obvious but extremely important event happens: The initiation of heads on the main shoot and tillers. Although the head at this time is microscopic, it’s already forming the parts that will become the floral structures and kernels.
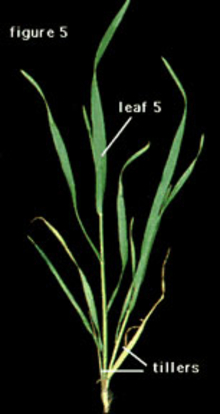
When head formation is complete, the stem begins elongating. This corresponds to the “jointing” stage (Figure 5). A plant usually has about five leaves at this time.
Stem elongation
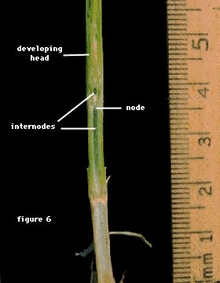
The plant’s lower stem internodes remain short throughout development. The fourth internode is usually the first to elongate in a plant with nine leaves.
This is followed by the internodes above it, in sequence (Figure 6), with each stem internode up the plant becoming progressively longer. The last stem segment to elongate, the peduncle, accounts for a considerable proportion of the total stem length.
Growth regulators designed to shorten plant stature and increase resistance to lodging are timed to influence stem elongation. Some regulators act as growth retardants and reduce elongation of the last two or three stem internodes, resulting in a shorter, stiffer stemmed plant that lodges less readily.
Head growth
Stem elongation coincides with the period of rapid head growth in which individual florets become prepared to pollinate and be fertilized.
Throughout the preheading period, differences in the duration of the various developmental phases among shoots on the same plant help synchronize development. This means a difference of several weeks between emergence of the main shoot and a tiller is reduced to a difference of only a few days by the time the heads emerge from the flag leaf sheaths.
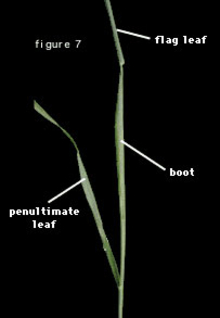
The “boot” stage is just prior to head emergence, when the flag leaf sheath encloses the growing head (Figure 7).
As the stem continues to elongate, the head is pushed out of the flag leaf sheath, a stage referred to as “heading.”
Within a few days after heading, flowering (pollination) begins in the head, starting first with the florets in the central spikelets. Within the next few days, flowering progresses both up and down the spike.
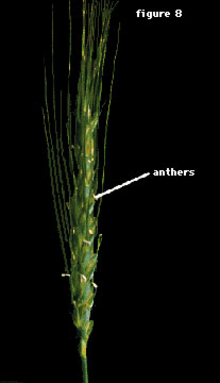
Flowering is usually noted by anthers extruding from each floret (Figure 8), although this can change depending on the variety and weather conditions. If the anthers within a floret are yellow or gray rather than green, you can be reasonably certain that the floret’s pollination has occurred.
The pollination period within a single head is about four days. The young kernels within a head vary considerably in size at pollination and maintain this size variation throughout grain filling to maturity.
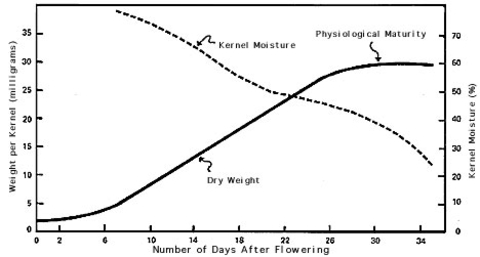
Figure 9 shows the growth pattern for an individual wheat kernel. A specific crop season’s conditions will somewhat modify this pattern as well as the final weight attained.
Growth progresses in three distinct phases spanning about four weeks under usual conditions. Figure 10 illustrates the appearance of wheat kernels during grain filling.
Developmental phases
The first phase – known as the “watery ripe” and “milk” stages – establishes the number of cells in the endosperm (the major starch and protein storage portion of the kernel). Not much weight accumulates during this phase.
Then, one to two weeks after pollination, the kernel begins rapidly accumulating starch and protein and its dry weight increases in a nearly linear manner. This is when most of the kernel’s final weight accumulates. The kernel consistency is “soft dough” during this time.
Finally, kernel growth declines about three weeks into grain filling and its weight approaches a maximum attained at physiological maturity. As the kernel approaches maturity, its consistency becomes “hard dough” and it loses its green color.
Factors affecting yield
Adverse environmental conditions during any of a kernel’s growth periods can reduce the rate of dry matter accumulation and decrease yield. As a rule, the longer the adverse condition lasts and the earlier it occurs during grain filling, the greater its effect on yield.
Leaf removal
For example, Table 2 provides information from an experiment with two spring wheat varieties in Minnesota during two years with very different weather conditions. It shows that removing the leaf blades early in grain development (at flowering) consistently reduced grain weight more than leaf removal two weeks later.
Furthermore, the average reduction due to leaf removal in 1979 was greater than in 1980. This is because 1980 was a particularly hot, dry year in which leaf removal, particularly later, was of less consequence. Although this experiment only measured effects of leaf removal on individual kernel weights, the results also approximate the effects on grain yield.
Table 2 shows reductions in final weight per kernel for spring wheat in two years in response to leaf removal at different times during the grain filling period. Results are averages for the varieties Era and Olaf.
Table 2: How leaf removal during grain filling affects kernel weight
| Year | Leaf removal at flowering | Leaf removal two weeks after flowering | Average |
|---|---|---|---|
| 1979 | 25% reduction in kernel weight | 10% reduction in kernel weight | 16% reduction in kernel weight |
| 1980 | 16% reduction in kernel weight | 4% reduction in kernel weight | 11% reduction in kernel weight |
| Average | 20% reduction in kernel weight | 7% reduction in kernel weight | 14% reduction in kernel weight |
Moisture percentage
Throughout grain filling the kernel moisture percentage declines (Figure 9), finally reaching a level between 30 and 40 percent at the time of maximum grain weight (physiological maturity).
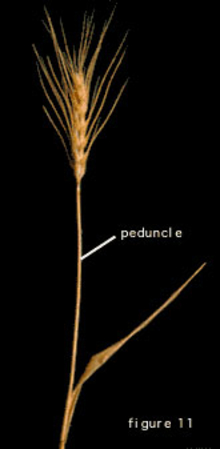
However, kernel moisture doesn’t always determine when physiological maturity occurs. A better indicator of maturity is when the head and the peduncle lose their green color (Figure 11). The green color is lost from the flag leaf blade when the kernel attains about 95 percent of its final dry weight.
Once the crop reaches physiological maturity, no more kernel dry weight will accumulate and it can be swathed without reducing yield.
After physiological maturity, moisture in the kernels declines rapidly (Figure 9). Combine the crop at 13 to 14 percent moisture to avoid postharvest drying costs and ensure safer storage.
Approximately 70 to 90 percent of the final grain yield is derived from photosynthates (products of photosynthesis) produced by the plant during grain filling.
The flag leaf and head usually contribute most, but certainly not all, of the photosynthate to the grain. Photosynthates produced by the flag leaf may contribute up to 50 percent of the grain yield, depending on seasonal conditions, but the head, penultimate leaf and other leaves can also contribute significant quantities.
Maintaining green and functional upper leaf blades, sheaths and heads during grain filling is important for high yields.
Anther: The part of the flower that produces the pollen.
Coleoptile: The sheath that encloses the first main shoot leaf and provides protection as it emerges from the soil.
Flag leaf: The leaf immediately below the head.
Floret: An individual flower within the head.
Glumes: The pair of bracts located at the base of a spikelet in the head.
Internode: The part of a stem between two nodes.
Jointing: Stage of wheat development when stem nodes are first detected above the soil: Zadoks stage 31.
Leaf blade: The flattened portion of a leaf above the sheath.
Leaf sheath: The lower part of a leaf enclosing the stem.
Main shoot: The primary shoot that emerges first from the soil and from which tillers originate.
Node (joint): A region on the stem where leaves are attached.
Peduncle: The top section of the stem between the flag leaf and the head.
Penultimate leaf: First leaf below the flag leaf.
Seminal roots: Roots arising at the level of the seed.
Spikelet: The flower of a grass consisting of a pair of glumes and one or more enclosed florets.
Tiller: A shoot originating from the base of the plant.
Bongard, P.M., Oelke, E.A. & Simmons, S.R. (2018). Spring barley growth and development guide.
Bauer, A., Eberlein, C.V., Enz, J.W., & Fanning, C. (1984). Use of growing-degree days to determine spring wheat growth stages. North Dakota State University Extension Bulletin, 37.3.
Haun, J.R. (1973). Visual quantification of wheat development. Agronomy Journal, 65, 116-119.
Large, E.C. (1954). Growth stages in cereals, illustration of the Feekes scale. Plant Pathology, 3, 128-129.
Chang, T.T., Konzak, C.F. & Zadoks, J.C. (1974). A decimal code for the growth stages of cereals. Weed Research, 14, 415-421. https://doi.org/10.1111/j.1365-3180.1974.tb01084.x
Reviewed in 2021


