The typical Minnesota gardening season ranges from May to September. Minnesota gardeners wait impatiently for the last spring freeze date in their area. The first frost in the fall is also important to know.
The Midwestern Regional Climate Center has produced an up-to-date interactive map of first fall and last spring freeze dates. Although the growing season is longer in the Twin Cities metro area and the far southeast corner of the state than other regions, most gardeners in Minnesota agree: the season is too short!
There are a number of ways to get an early start in the garden and stretch the harvest longer into the fall.
- Soil-warming mulches help get direct-seeded and transplanted crops off to a good start.
- Tunnels, cold frames, hot caps, tents and floating row covers provide protection from cold and wind, allowing gardeners to start early and keep harvesting until late in the year.
The Minnesota Department of Agriculture (MDA) keeps track of current soil temperatures throughout much of Minnesota. Even if you do not use any techniques to start early, you will still want to know when the soil is warm enough to plant heat-loving crops such as sweet corn, cucumbers, melons and squash. If MDA’s map does not cover your area, use a thermometer to measure the temperature two to four inches below the surface.
Soil warming mulches
How to use plastic mulch
To warm the soil for heat-loving plants, put plastic mulch in place one or two weeks before planting. You can also lay the plastic and plant the same day. With this method, the effect of the plastic will come later.
The surface of the soil needs to be smooth and level for black, green/olive, blue and red plastic mulch to warm the soil. The plastic absorbs the sun’s energy and conducts it to the soil touching the plastic. If there are air pockets under the mulch, the plastic will not transfer the heat.
Clear plastic mulch does not need to be in complete contact with the soil, although it is best to apply it smoothly. It warms the soil more than black plastic because a film of water forms on the underside of the mulch. Heat cannot escape from the soil because the water blocks energy that is trying to escape. In this way, the soil absorbs more solar energy under clear plastic than under black plastic.
Depending on your garden soil type, and how much rain your garden gets, rain that falls on soil not covered by plastic may move laterally and supply your plants with water. Plastic mulch helps soil retain water. The soil under the plastic can also become very dry. You can design and install a system of drip irrigation under the mulch, or plan to water your plants at the holes you cut for planting.
Installation
- Prepare your garden, working in fertilizer and/or compost. You may wish to form raised beds before applying the plastic film.
- Choose a calm day to lay the mulch.
- Laying the plastic in the heat of the day will result in the best installation since the mulch shrinks as temperatures drop. If installed in cool temperatures, the mulch will become loose and ripple as the day warms, making it less effective.
- The soil should have high moisture before you lay the plastic.
- Pull the plastic as taut as possible and weigh the edges down with soil. You can also use rocks, soil staples or other weights instead of soil, just remember any exposed edge is subject to wind and can easily dislodge.
- When you are ready to set plants out or sow seed, cut holes in the mulch.
Black plastic and clear plastic
Covering garden soil with black plastic film has been a standard soil-warming practice for many years. Black plastic can increase the soil temperature about 5°F, and prevents weeds.
Clear plastic mulch is even more effective at soil warming, increasing soil temperature by as much as 14°F. Unfortunately, weeds can grow and flourish under clear plastic in mild weather. If the weather is hot and sunny enough to kill the weeds, in a process called “soil solarization,” it is also hot enough to harm the roots of vegetable plants.
Green or olive wavelength-sensitive plastic
- Infrared-transmitting (IRT) plastic mulch is usually green and somewhat transparent.
- It prevents weeds similar to black plastic, but warms the soil as well as clear plastic.
- This type of mulch is less common in catalogs and garden centers, and is somewhat more expensive.
- Green wavelength-sensitive plastic mulch has increased yields of melons and squash, and has allowed for a much earlier harvest.
- Soil under these plastic films may become excessively hot as summer progresses.
Red and blue plastic
Red plastic mulch has improved yields of some crops, including tomato and eggplant, by changing the quality of the light reflected up into the plants. Blue mulch improved yields in cucumber, melon and squash.
These colored mulches warm soil as much as black plastic, but do not control weeds as well. You must stake or trellis crops grown on these plastic mulches for vertical growth, so that the mulch surface stays exposed for maximum reflection.
For home gardeners, it may not be worth using them instead of black plastic. A change in reflected wavelengths from red or blue plastic will probably not contribute much to the success of heat-loving crops in the short Minnesota growing season. In Minnesota, yields of heat-loving plants will improve by:
- choosing appropriate varieties
- seeding or transplanting into warm soil
- setting sturdy plants out in the garden
- using protective structures to keep the plants warm at the beginning of the season
- controlling weeds, insects and diseases
Problems with plastic mulch
- Soil underneath plastic mulch is not as good a habitat for soil-dwelling organisms as soil under organic mulch such as paper, composted leaves or straw.
- Petroleum is a component of plastic mulch, so you must throw your plastic mulch away at the end of the season. Many people would rather not purchase new plastic each year and then have to bundle and throw away cumbersome sheets of dirty plastic.
- Substitutes for plastic mulch solve some of these problems, but do not bring all the benefits of plastic mulch.
Biodegradable and photodegradable alternatives to plastic mulches
Paper mulches
- Paper mulches can provide excellent weed control.
- Layers of any paper, including newspaper, provide a weed barrier and decompose over the course of the growing season.
- Cover your paper mulch with clean straw.
- Do not mulch with organic materials until the soil has already warmed up. Most organic mulches actually keep the soil cooler than bare ground.
- A single layer of paper will tear and allow weeds to grow. Multiple layers work better, but can become soggy and slippery during rainy periods.
Landscape fabric or permeable fabric mulches
- Black woven landscape fabric that is permeable to water can increase vegetable yield in home gardens.
- The biggest advantage of the fabric over plastic is its permeability for water.
- It is hard to determine how well this fabric will work. Many different kinds are on the market. Some fabrics are more permeable for water, and some can last several years.
- Apply landscape fabric mulches the same way as plastic mulches.
- Remove landscape fabric mulches at the end of the growing season.
- If you have any disease problems in your garden, discard the landscape fabric mulch as it can keep disease from one year to the next.
Protective structures and covers
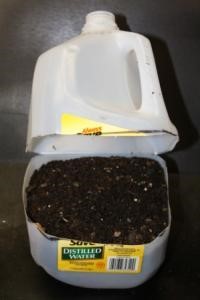
Winter sowing in milk jugs
Using empty milk jugs as tiny greenhouses, you can start seeds for transplants outdoors instead of inside. Winter sowing is a good idea for gardeners who do not have space to set up trays, plant pots, lights and heat mats.
Cold frames
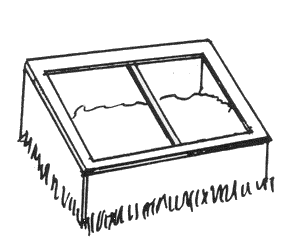
A cold frame consists of a shallow, unheated box with a transparent cover. Cold frames use the warmth of the sun to heat up the growing environment during the day, and protect plants from the cold at night.
You can repurpose scrap lumber and old window sashes as cold frame construction materials. The lid should close snugly to keep warm air from leaking out, but must be on a hinge so that you can vent the cold frame during the day.
You can also use cold frames with an electric heating mat as a bottom heat source, or "hot bed", to extend the growing season.
Cool-season crops such as lettuce, kale, cabbage, cauliflower or broccoli will perform well when grown in cold frames during cool months. You can also use cold frames to harden-off heat-loving seedlings such as tomatoes, peppers or eggplants, acclimating them to outdoor conditions.
Building a simple cold frame takes a few hours and requires only simple tools: a hammer, a drill, a saw, and nails or wood screws.
- Start with a 4 x 8 sheet of plywood and three 8-foot lengths of 2 x 2.
- Cut the plywood into four 2 x 4-foot pieces.
- Cut one 2 x 2 into four 2-foot long pieces.
- Cut the other two 8-foot 2 x 2s into four 4-foot pieces and save them for the cover.
- Set the 2 x 4-foot pieces to form an open box with the edges of the sidewall pieces flush with the edges of the front and back pieces, so the box will be slightly wider than deep.
- Nail or screw the edges of the 2 x 4s into the 2 x 2s to reinforce and stabilize each corner.
The finished product will be an open-ended box: four feet wide, four feet deep and two feet high. Paint it inside and out with a white, oil-based paint to prevent deterioration. The white paint reflects light inside the coldframe.
Place the cold frame in a site that receives direct sun at least half the day. The best position is facing due south, but a southeastern or southwestern exposure could work. To let the sunlight in, lower the front of the cold frame by digging a trench six inches deep along the front and tapering back along the sides. Secure the cold frame by packing the soil back along the sides and front.
Cover with old storm windows, attached with hinges to the back wall. The more snugly the windows fit together and to the cold frame body, the better.
Eight standard 21"x 10.5" nursery trays of seedlings will fit in this cold frame. To keep the undersides of the trays clean, put a piece of landscape fabric in the bottom of the cold frame.
Hot caps and cloches
Cloche is the French word for “bell,” and describes a bell-shaped glass dome placed over a garden plant. Any cover for an individual plant that acts like a mini-greenhouse by trapping heat from the sun is a hot cap. Hot caps can raise daytime temperatures and maintain warmer nighttime temperatures, as well as provide protection from wind. Sometimes removal or venting during the day is necessary because plants may overheat.
Garden centers usually carry relatively inexpensive waxed-paper hot caps in spring. Some have a flap at the top that opens to vent excess heat during the day, and then closes to protect the plant at night. If such a flap is not already present, cut slots in the top. Anchor the hot cap with stakes, soil staples or soil pushed over the edge. When the top of the plant reaches the top of the hot cap, remove and discard it.
You can also use plastic milk jugs or soda bottles with the bottoms cut off as cloches. In this case, remove the plastic lid for ventilation, and then replace it at night. Anchor milk jugs with stakes or soil staples so they do not blow away. Plants will quickly outgrow soda bottles and milk jugs, but since spring can turn quickly to summer in Minnesota, these no-cost cloches may be all that you need.
More expensive, but more durable, are glass and clear plastic cloches. Glass cloches are heavy enough that they will not blow away in strong wind. Anchor plastic cloches by staking or burying the rim. The cloches should have vented tops.
Water-filled tomato protectors
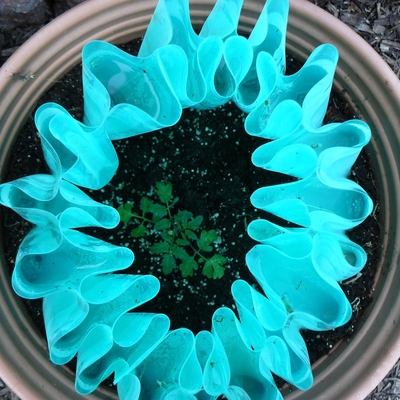
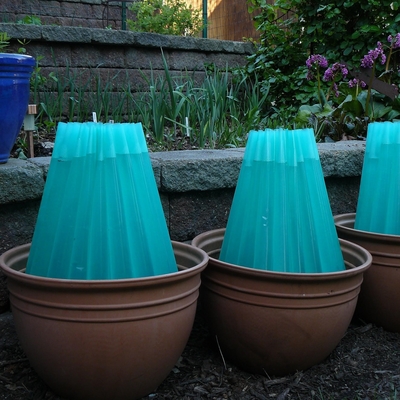
Tomato water walls such as the “Frost Jacket,” ‘Kozy-Coat®” and “Wall o’ Water™” are for warmth-loving transplants such as tomato, pepper and eggplant. The water-filled cells accumulate heat during the day and release it slowly during the night. When using these protectors, you can transplant tomatoes, peppers and eggplant out to the garden three weeks earlier than normal.
Remove the water walls once the plant begins to emerge from the top. Empty out the water, wash and allow drying before storage. With good care, these plant protectors can last many years. Even if one or two cells leak, they will still provide protection.
Jackets and tents
A new type of individual plant protector based on camping tents and beach sun-shelters is available. Equipped with zippers and pop-up mechanisms, these cylindrical jackets and rectangular shelters accumulate heat, protect against wind and maintain warmth overnight. Set them up after planting and installing cages or stakes.
A simpler jacket available for gardeners to try is a tube of red, micro-perforated plastic film. It is similar to the plastic film that protects clothing after dry-cleaning. This plastic jacket is red, which may promote higher yields. The plastic will protect against wind and disease spores carried by soil splash. It will provide limited insulation against cold nights.
Cut the plastic in sections, and slip it over the tomato plant and cage. Fasten it to the base of the cage or anchor it to the soil. Tie the top closed, and then open for ventilation on warm days.
Floating row covers
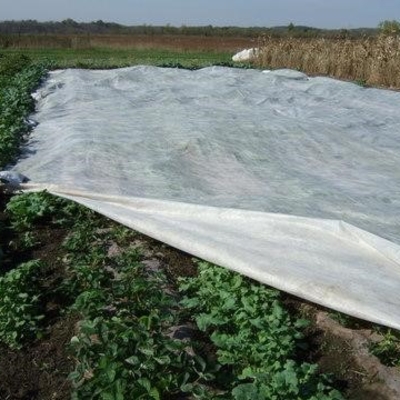
Floating row covers are lightweight synthetic fabrics laid directly on top of a row of plants to protect against cold and insects. They are usually synthetic fabrics, either spun-bonded, knit or woven, with varying degrees of light transmission and insulation against cold temperatures. From fleece to fine mesh, there are many different weights of row cover material. They all allow rain to flow through them.
Lay down row cover fabrics over the row after planting. Allow some slack in the fabric so the plants have room to grow. If the fabric comes loose in the wind, it can harm young plants. Anchor it on all sides with soil pins and/or soil to keep the edges firmly in place.
Most gardeners use row covers for a month or less, then remove them. For plants that require insect pollination, including cucumbers, squash, melons and pumpkins, remove the cover once the plants start to bloom, so that bees can reach the flowers.
Row cover fabric can last more than one season with care and luck.
Heavy row covers
- The heaviest row cover fabrics can protect plants against cold temperatures around 20°F.
- They will block 40 to 50 percent of the sun’s light, interfering with plant growth.
- On warm days, they could retain too much heat and kill the plants underneath.
- Heavy row cover fabrics are best for use briefly at the beginning or end of the season, when overnight freezes are possible.
Medium weight row covers
- Medium weight fabrics provide warmer air and soil temperatures during the day and protect against light frost.
- They transmit 75 to 85 percent of available sunlight.
- For heat-loving plants such as melons and squash, medium-weight row covers can protect plants during their first week or two in the garden, when temperatures may not have settled.
- Open the cover to vent built-up heat on very bright days, and remove the cover once temperatures are consistently warm.
- For cold-tolerant greens, a medium row cover applied in September can keep plants alive later into fall.
Lightweight row covers
- Their usual use is only to protect plants against insects.
- Lightweight row covers will transmit more than 90 percent of available light.
- Their design keeps heat from accumulating inside.
- The fine mesh can block flea beetles, flies, thrips and leafhoppers as well as larger pests such as cabbage looper moths and cucumber beetles.
- Before covering, be sure to check that plants are free from larvae that may feed on plant leaves.
Low tunnels and supported row covers
You can use the same fabrics from floating row covers with semi-circular supports to form a low tunnel over the row of plants. Many gardeners prefer to use supported row covers, because even a well-secured floating row cover can whip and flap on a windy day, harming tender plants.
- Heavy-gauge wire (9 or 10 gauge) cut in three to five foot pieces, and stuck into the soil with the ends 16 to 32 inches apart, will form U-shaped supports.
- After planting the row of vegetables, insert the ends of the wires six inches deep on either side of the row, placing a wire section every three feet.
- Drape the row cover over the hoops, and anchor at the sides with pins and soil.
- Gather and secure the fabric at the ends of the tunnel.
- On warm sunny days, leave the end open for ventilation. Gather the fabric again and close the tunnel overnight.
High tunnels
A high tunnel is a large, semi-permanent structure, tall enough for an adult to stand up inside. A high tunnel is ideal for very large gardens or commercial vegetable farms. High tunnels provide a growing environment protected from most of the elements, as well as some disease and insect pests. Unlike a greenhouse, a high tunnel has no heating or cooling system, and usually does not have benches or tables for plants.
While wire supports form low tunnels, high tunnels use metal tubing. They may also have wooden sills or low walls, framed ends with hinged doors, and mechanisms for venting the tunnel along the sides or through slats at the ends.
Reviewed in 2024


