While we may complain a little about the comfort and energy costs of older homes, we also speak with reverence of their durability. There are a number of reasons why older homes have endured the test of time. One reason is the difference between the dimension lumber used to construct older homes and the growing number of composite materials used in newer frame construction. While some composite materials are more durable than traditional framing and sheathing materials, others are less durable and are not able to survive wetting and drying cycles as well as dimension lumber.
Drainage plane
Another factor that contributes to the durability of homes is their ability to resist Minnesota weather. On the exterior of homes, building materials that can't stand up to repeated exposure to water must be protected by another layer. This protective layer is often referred to as the drainage plane. It should cover the entire house from bottom to top and includes:
- The foundation (footings and walls) drainage system.
- Weather resistive barrier (housewrap or building paper).
- Flashings and roofing components.
The outside surfaces of windows, doors and skylights are also part of the outer surface of a building and must be carefully integrated with drainage plane components. Starting at the foundation, every element of the drainage plane must be installed so it will direct water out and over the layer below it in the same fashion as the overlapping of shingles on a roof. If they are not overlapped properly, or reversed, water may be directed into the building and result in a failure.
Every element of the drainage plane must be installed so it will direct water out and over the layer below it.
What to do
Complex roofs require more flashing
Many newer homes have roofs that are more complex than the roofs on homes built here a few decades ago. The more complex roofs require flashing in more locations. Skilled onsite fabrication of flashing demonstrates the classic combination of form and function. Two commonly seen flashing details are apron flashings and step flashings. Because they are used so often, they are also seen incorrect or incomplete the most often. Here are some suggestions on how to get the best results with these important drainage plane details.
Apron flashing
Apron flashings are seen where the top edge of a shed roof meets the side wall of a building.
Example
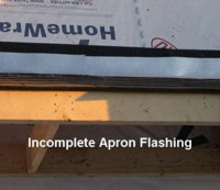
Incorrect apron flashing (photo 1):
- The roofing felt and apron flashing were both applied after the housewrap. They are open at the top.
- This will direct any water that gets past the siding and runs down the outside of the housewrap into the building instead of down and to the outside.
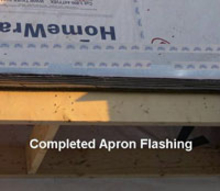
To avoid damage to the home, this can be corrected (photo 2):
-
Before the siding is installed, cut the housewrap horizontally above the roofing felt and slip another strip of housewrap up under the existing housewrap on the wall (shingle fashion).
-
The new strip of housewrap should extend over the roofing felt and flashing as shown in the photo of the completed apron flashing.
-
Contractors tape is used to fasten the strip of housewrap where it tucks under the existing housewrap and also to hold it against the metal apron flashing until the siding has been installed over it.
-
Now, any water that gets past the siding and runs down the surface of the drainage plane (housewrap) will be directed to the outside of the apron flashing and then onto the roof.
Contractors tape is the fastener that holds the drainage plane layers in place and is not a substitute for properly lapping the layers shingle fashion. If tape is applied at the top of a reverse-flashed detail to "seal" the connection, it is only postponing failure and usually not for very long.
Installation methods
One method is to:
-
Install a wide piece of housewrap or building paper between roof and wall connections with about a foot extending above the roof and about a foot extending below.
-
Lap the upper wall housewrap over it from above, following completion of the roofing details, and tuck the housewrap or building paper from the walls below up underneath it.
Another method is to:
-
Cover the entire wall with housewrap before adding roof framing against the walls.
-
Then cut and hold the housewrap up and out of the way while installing the roofing paper, shingles and apron flashing.
-
After the roofing is completed, fold the housewrap back down to cover the apron flashing and fasten in place.
Each method has its advantages.
Step flashing
Step flashing is used where a roof gable meets a side wall.
Example
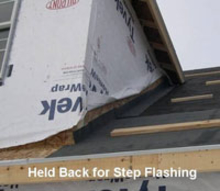
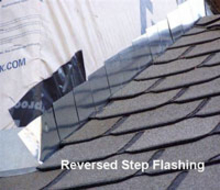
In both pictures illustrating step flashing (photos 3 and 4), this occurs on the side of a dormer. In this situation, the step flashing extends over the apron flashing that is used where the lowest wall of the dormer meets the roof.
The same principles (above) of installation apply when installing step flashing. One method is to complete the roofing details before installing housewrap and another is to install the housewrap but leave it held back for the step flashing to be installed by the roofers as shown in the picture (photo 3).
- Problem: If the roofing crew installs the roof underlayment and flashings against the outside of the housewrap as shown in the picture (photo 4) of reversed step flashing.
- Correct: It can still be corrected by cutting the housewrap above the flashing and inserting a strip of housewrap following the same steps as described and shown above for the apron flashing.
Apply drainage plane layers shingle fashion to keep water out
The details may vary slightly depending on the location of the flashing but the concept is always the same. To achieve durability, water must be kept from entering building assemblies from the outside. To keep the water on the outside, drainage plane layers must be applied shingle fashion to direct the water out and away which allows gravity to work for you instead of against you.
When completing flashing details for mechanical penetrations, walls should be treated similarly to roofs. A number of millwork manufacturers are providing installation instructions with windows and doors. The instructions must be followed to receive the manufacturer's warranty protection. As a result, most windows and doors are now installed in walls using flashing details that compare to those for installing skylights on roofs.
Flashing penetrations in walls
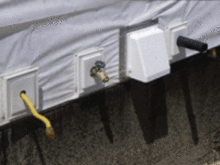
In addition to window and door openings, a house typically has 20 or more mechanical penetrations on the outside walls.
Walls should be detailed the same way as roofs
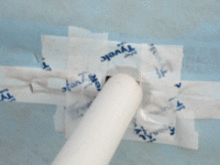
It would be pretty surprising to see a PVC plumbing stack on a roof with contractor's tape pasted all around it to protect against water intrusion yet this is a commonly seen practice on walls.
The list of mechanical penetrations through walls quickly add up:
- Electrical and gas service entrances.
- Heating and gas fireplace air intakes and exhausts.
- Air conditioning lines.
- Outdoor water faucets.
- Light boxes.
- Outdoor outlets.
- Phone and cable service entrances.
- Ventilation system intake and exhaust hoods.
Improperly flashed penetrations can become leaks
If they are not all flashed properly, these can become leaks into wall cavities or even leaks across the entire building envelope and into the home. These leaks create the potential for energy loss, comfort complaints and especially for durability losses.
We know that all exterior finish systems leak to some degree. Some finishes, like metal or vinyl sidings allow a significant percentage of wind and water to get past them to the drainage plane. It is commonly accepted that the drainage plane on the exterior of the home is the primary defense against wind and water intrusion.
As with windows and doors, each mechanical penetration should be integrated with the drainage plane so it effectively seals against water and wind intrusion while directing water outward and downward in a shingle fashion.
It is important that every trade working on the job understands the importance of keeping wind and water out of the house. They must complete their work in a way that either assures effective weather resistance or makes it easy for the trades who follow them to finish the next steps in the process until the assembly is completed.
Wall blocks
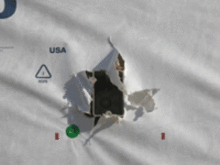
Wall blocks are most often installed against the outside of the weather resistant barrier (WRB). Sometimes the perimeter is taped to the WRB, but usually not. This may look good and prepare the wall for siding installation, but it will probably not keep air and water from getting into the wall assembly or behind the WRB.
The opening for a wall block should be prepared in the same way as the opening for a window:
- The wall penetration should be sealed behind the wall block so it directs water down and over the outside of the WRB below the opening.
- The wall block is then installed as part of the drainage plane, lapping over the WRB below the penetration.
- The sides and the head of the block are then taped and sealed shingle fashion, similar to a window, to complete the detail.
Manufactured flashings with neoprene gaskets
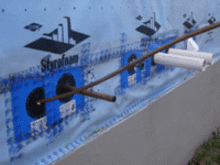
Manufactured flashings for exterior wall penetrations are now available. Instead of tapes and sealants, a neoprene gasket creates the seal against the pipe or duct and the top of the flashing is tucked into a slit in the WRB. Then the top flap and the sides are secured in place with durable tape. This is very similar to the process used to install a neoprene flashing over a plumbing stack on a roof. On roofs, flashings are integrated with the shingles, roofing paper and other roofing components. On walls, flashings are integrated, shingle fashion, with the WRB and other wall components to create a continuous drainage plane from top to bottom.
Before manufactured wall flashings were available, some people used neoprene roof flashings for wall penetrations like air conditioning lines or PVC heating exhaust and intake pipes. Others shaped flexible window flashing products to create flashings for mechanical penetrations of all shapes and sizes on exterior walls. All of these options can effectively protect the exterior of a home from wind and water intrusion.
Apply drainage plane layers shingle fashion to keep water out
The important thing to remember when completing the exterior drainage plane of the home is that everything should be applied in a shingle fashion to direct the water downward and outward. When under full assault by wind and rain, the drainage plane should protect the sides of the building as effectively as the roof protects it from the top.
Doors, windows and skylights are installed across the building envelope from the interior to exterior finished surfaces of a home and have many roles:
- Provide access and ventilation.
- Architectural features.
- Protect the structure and its occupants from the elements.
Following is an overview of installation details that are used to fully integrate doors and windows with the drainage plane. These details provide the structure with maximum protection against water intrusion and exposure to Minnesota weather.
Flashing components and information
Skylights provide a good example of integration into the drainage plane. Flashing components and detailed instructions for the installer are usually packaged with skylights. Millwork manufacturers are beginning to make flashing packages available for side wall installations as well. Door and window flashing installation kits and guidelines are also provided by a number of weather resistant barrier (WRB) and flashing product suppliers and manufacturers. While all these sources of guidance for door and window installation are useful, the information may not be getting out to everyone that needs it. Many out of date or questionably effective practices are still frequently seen in new construction.
The concept is simple. Every component of the drainage plane from the footings to the roof must be applied "shingle fashion" to direct water down and out.
Installing doors and windows
Install sill flashing
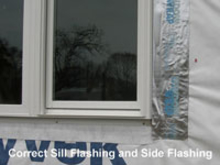
To prepare for a door or window installation, a sill flashing is installed on the subfloor or rough opening. This directs any water that may leak through a door or window assembly back to the outside surface of the weather resistant barrier (as shown by the window corner with correctly completed sill and side flashings or directly out to the exterior finished surface).
Caulk the tops and sides of flange
When installing doors and windows, the top and sides of the flange should be sealed to the surface behind them with a bead of good quality caulking.
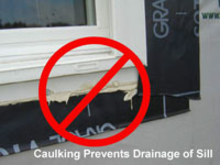
Don't caulk the sill flanges
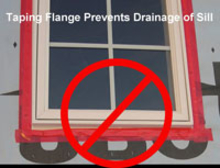
However, the outside of sill flanges should NOT be caulked or sealed. Caulking or taping the bottom flange as shown in the examples can trap water in the sill instead of allowing it to drain back to the WRB or an outside finished surface.
Use flashing tape
The example showing the incorrectly taped sill flange also shows the use of WRB tape on the side flanges where flashing tape should have been used. Side flanges should be sealed to the weather resistive barrier using flashing tape that has been designed for that purpose and will stay flexible to allow for normal movement and seal nail penetrations.
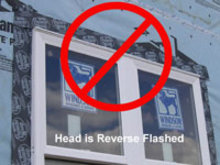
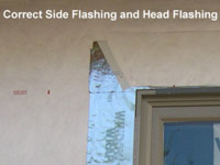
Where the water runs down the weather resistant barrier and on to the window, flashing tape is installed over the top flange (or metal head flashing) and side flashings. The weather resistant barrier is then lapped over the flashing tape and held in place with WRB tape until the siding is installed, as shown in the example of correctly installed side and head flashings.
Incorrect
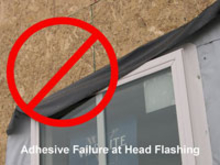
Too frequently, the flashing tape is applied over the flange and on top of the weather resistive barrier. When the head of a door or window is reverse flashed, the adhesive component of the flashing tape must stop any water running down the wall. Weather conditions or improper installation can lead to a failure of the adhesive which may allow water to enter the window rough opening and window assembly.
Correct
If the housewrap or building paper (WRB) is lapped over the flashing tape and fastened in place as shown in the correctly completed corner detail, gravity will direct the water out even if the fastening tape and flashing adhesives degrade over time.
If weather conditions are a concern, use mechanical fasteners to hold flashing tapes in the correct position until the next step can be completed. In the case showing adhesive failure there are at least three obvious opportunities for improvement visible. The flashings are installed behind the head and side flanges of the window (reverse flashed) and staples could have been used to hold the flashing tape in place until the weather resistant barrier was completed by another crew.
- Using dependable products that are applied in a "shingle fashion" will give the best results when managing water on building exteriors.
- When choosing and installing building products, always follow the manufacturer's recommendations.
- To assure proper performance of every building assembly, read the technical information for all materials used on the job.
- When needed, provide the appropriate specialized training to the trade professionals who will be responsible for completing each task.
- The outcome mostly depends on individual craftsmanship and a good understanding of building science and the building process by everyone who touches the job.
Reviewed in 2018


